

 Pearl Burgoff
1 min read
Tech Tuesday: Change Connection Type on the Fly
For this week's Tech Tuesday, we share how to change the connection type on the fly by combining Tekla Structures with the Qnect connection design...

Qnect's Henry Lederman and Aaron Bartlett, recently hosted a webinar titled "Determining the Lowest Cost Joint Configuration" for the general public. This blog post is due to the positive responses and requests for the recording.
The transcript below starts at marker 1:36 and ends just before the Q&A starts. This is the meat of the webinar and we hope you enjoy it.
Transcript from July 17th Webinar - starts at marker 1:36 after Aaron's introduction.
Today we will show you how to evaluate the lowest cost joint configuration whether that be single angle, double angle, shear plate, extended share plate or some combination of those; and variations of bolts between three quarters to an inch and an eighth.
Why is this important?
It's the classic case of technology drives innovation; innovation drives efficiency and efficiency makes us more competitive.
Qnect is a powerful software that significantly impacts schedule while lowering costs. So for example, using Qnect, the lowest cost joint configuration will likely save anywhere from 20% to 50% of the bolts in a building. That's what we have historically seen job after job.
So let's show you how it's done and to do that let’s first start with a quick refresher of how Qnect works.
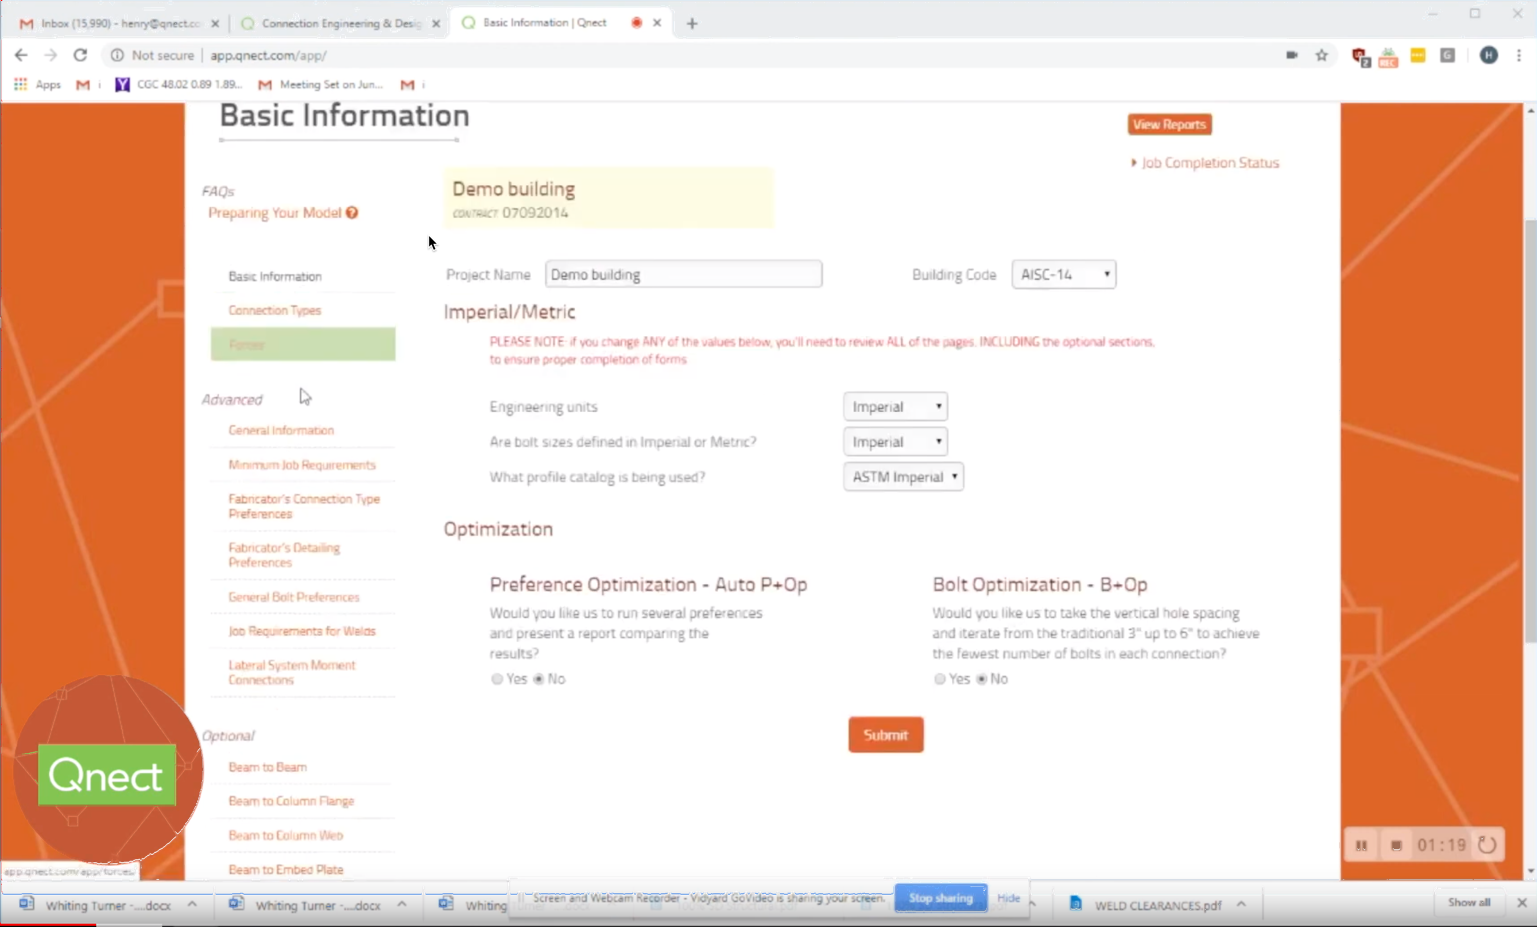
You're currently looking at the Qnect website and here we set up all the preferences that creates the parameters by which each joint will be designed.
So let's now once that's done let's now look at the Tekla model and how this process works. Now we're in a Tekla model and when you download the Qnect app you'll see buttons one, two and three. We could run this whole building right now and we'll connect maybe 80% of the connections it will take about a minute and 20 seconds. But we're just going to do one joint because we want to get to the optimization parts sooner.
Just as a matter of perspective we can run a we've run a 43,000 ton project in 35 minutes and we're currently being used on several 60 story buildings in New York City where we ran 15,000 joints in two and a half hours, so the speed is significant and it allows us it allows us to examine the joint configurations for the lowest cost because it can happen so early in the process including by the way during the estimating stage where you can get a real understanding and a handle on the joints themselves and the cost and therefore your ability to price competitively.
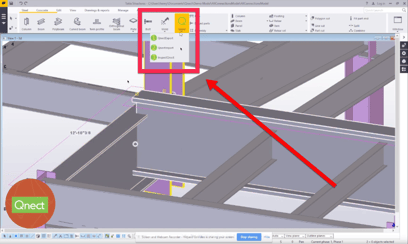
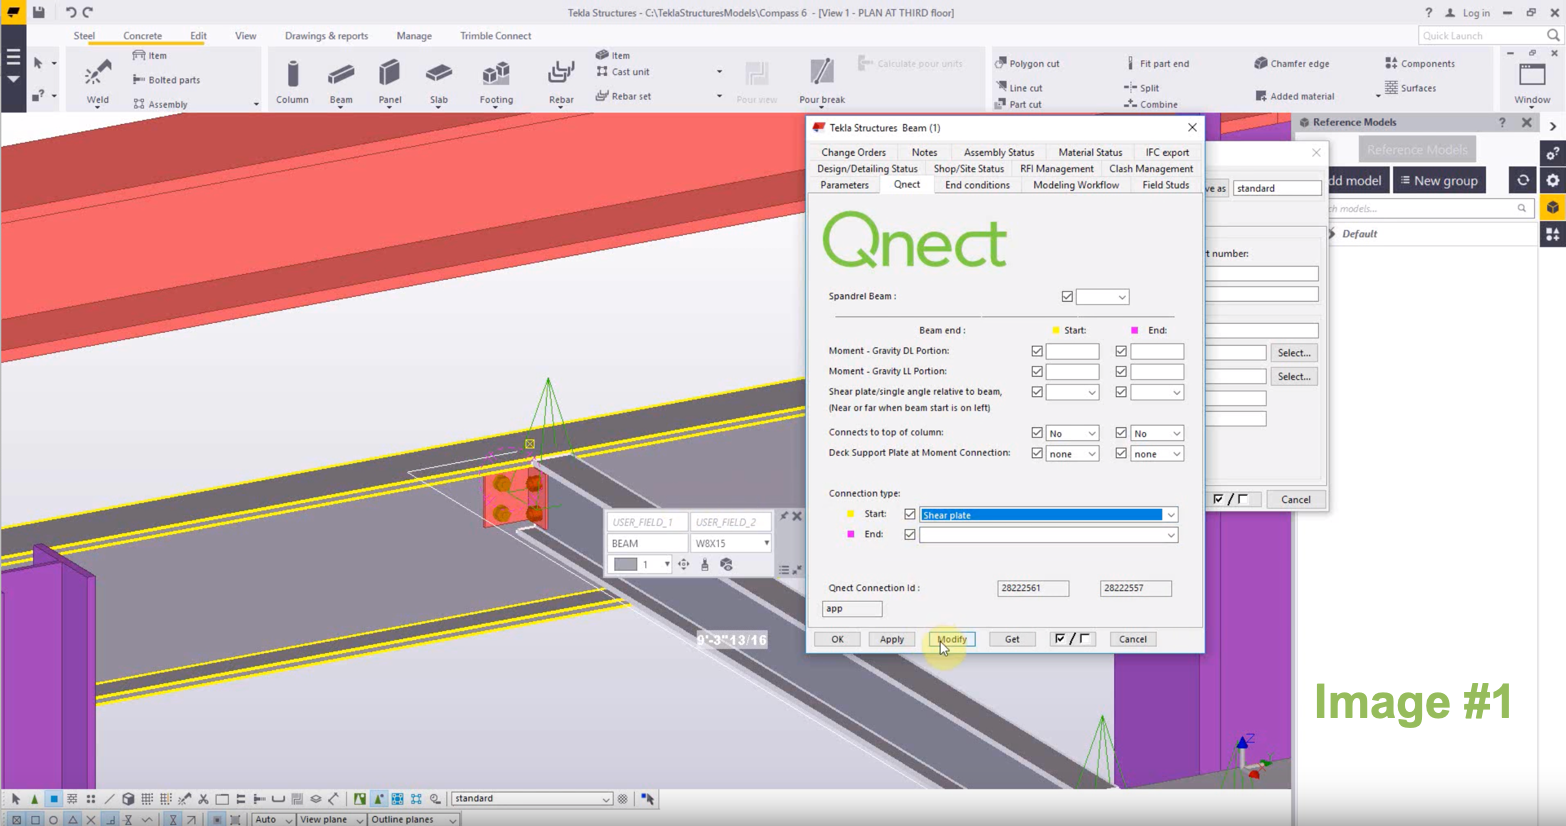
Let's start with this one joint. What we will do again whether it's the whole building one joint, one floor, we will select the joint and then we hit button number one (see image). We find the job and the company name of the job and it will do the session and submit. And, again, because this is so extraordinarily fast we generally would get an email that says it's ready but we're just going to go right into the model. There it is. Submit and the connection is in the model. This also gives you a bit of a window into our ability to mitigate revisions that are caused by incomplete designs, changes etc by being able to make the changes, generally about three per second.
So here we have a standard connection. You can see it visually, it's about a three inch spacing. When we click on the cone we get a general output, angle size, full size etc. When we click on the strength we will see the output limit state results, Block (Shear), Tensile Rupture, etc. When we click on the code we will see the full AISC text, calculations, the AISC references, etc so that's a refresher. As to the process again this whole building would have taken about a minute and 20 seconds.
Now I want to show you bolt optimization and to do that we're going to go back up to the website and we're going to activate bolt optimization. Qnect will actually completely engineer every joint for the whole building for:
..full engineering, will compare the results and then select the vertical spacing with the fewest number of bolts. So we just have to say yes we activate it and then we come back to the website and we'll just observe that there's six bolts and will delete this connection and now we're gonna run it for an optimized joint again. We hit button number one and we'll come in here “demo - 7 -17…” - - we can call it B+Op or Bolt optimization and we submit. We're good again. We're not going to wait for an email; maybe it's there it's not there yet and we're just slightly too quick. Let's see if it's ready now and it is. We submit. And connection is done.
As you can see the vertical bolt spacing is pretty dramatically changed from three this looks like probably five inches but in the process we have saved 33 and a third percent of the bolts, we've met all the limit states and so we have less bolts to purchase. Double those number of bolts fewer holes to drill and less number of bolts to shop, installed and certainly less bolts to field install. We're already starting to see some opportunities and some benefits through the bolt optimization.
That's your first [optimization].
Now let's go to our second optimization which is the preference optimization so because the software is so extraordinarily fast we can now examine many different joint configuration to determine the lowest cost. While running the building and we again the way we do that is by running the building eight additional times with eight different joint configurations, we can simultaneously do bolt optimization so we can get the correlation between each different joint configuration with its optimization.
I'm going to show you that so it's clearer. Let's submit. Now we're going to come into the model and we're going to delete this connection and we're going to run it with both P+Op and B+Op activated. So “demo - 7 - 17 - three alright. We'll submit and now again the Qnect has grabbed the data, brought it up to its web service [and] is running the engineering eight additional times. What you'll see here that it says the job is running it's trying a single angle, double angle three quarter inch bolt etc and already its done.
It's the classic case of technology drives innovation, innovation drives efficiency and efficiency makes us more competitive.
Once that's done we will go to the reports will find our go find our demo that we just did “7 - 17 - 3.” We come in here, we do P+Op comparison then we hit the P+OP and now we should see eight runs. And here we are we have what we call it as a baseline run that we asked from our clients which is the intended joint configuration they were going to use.
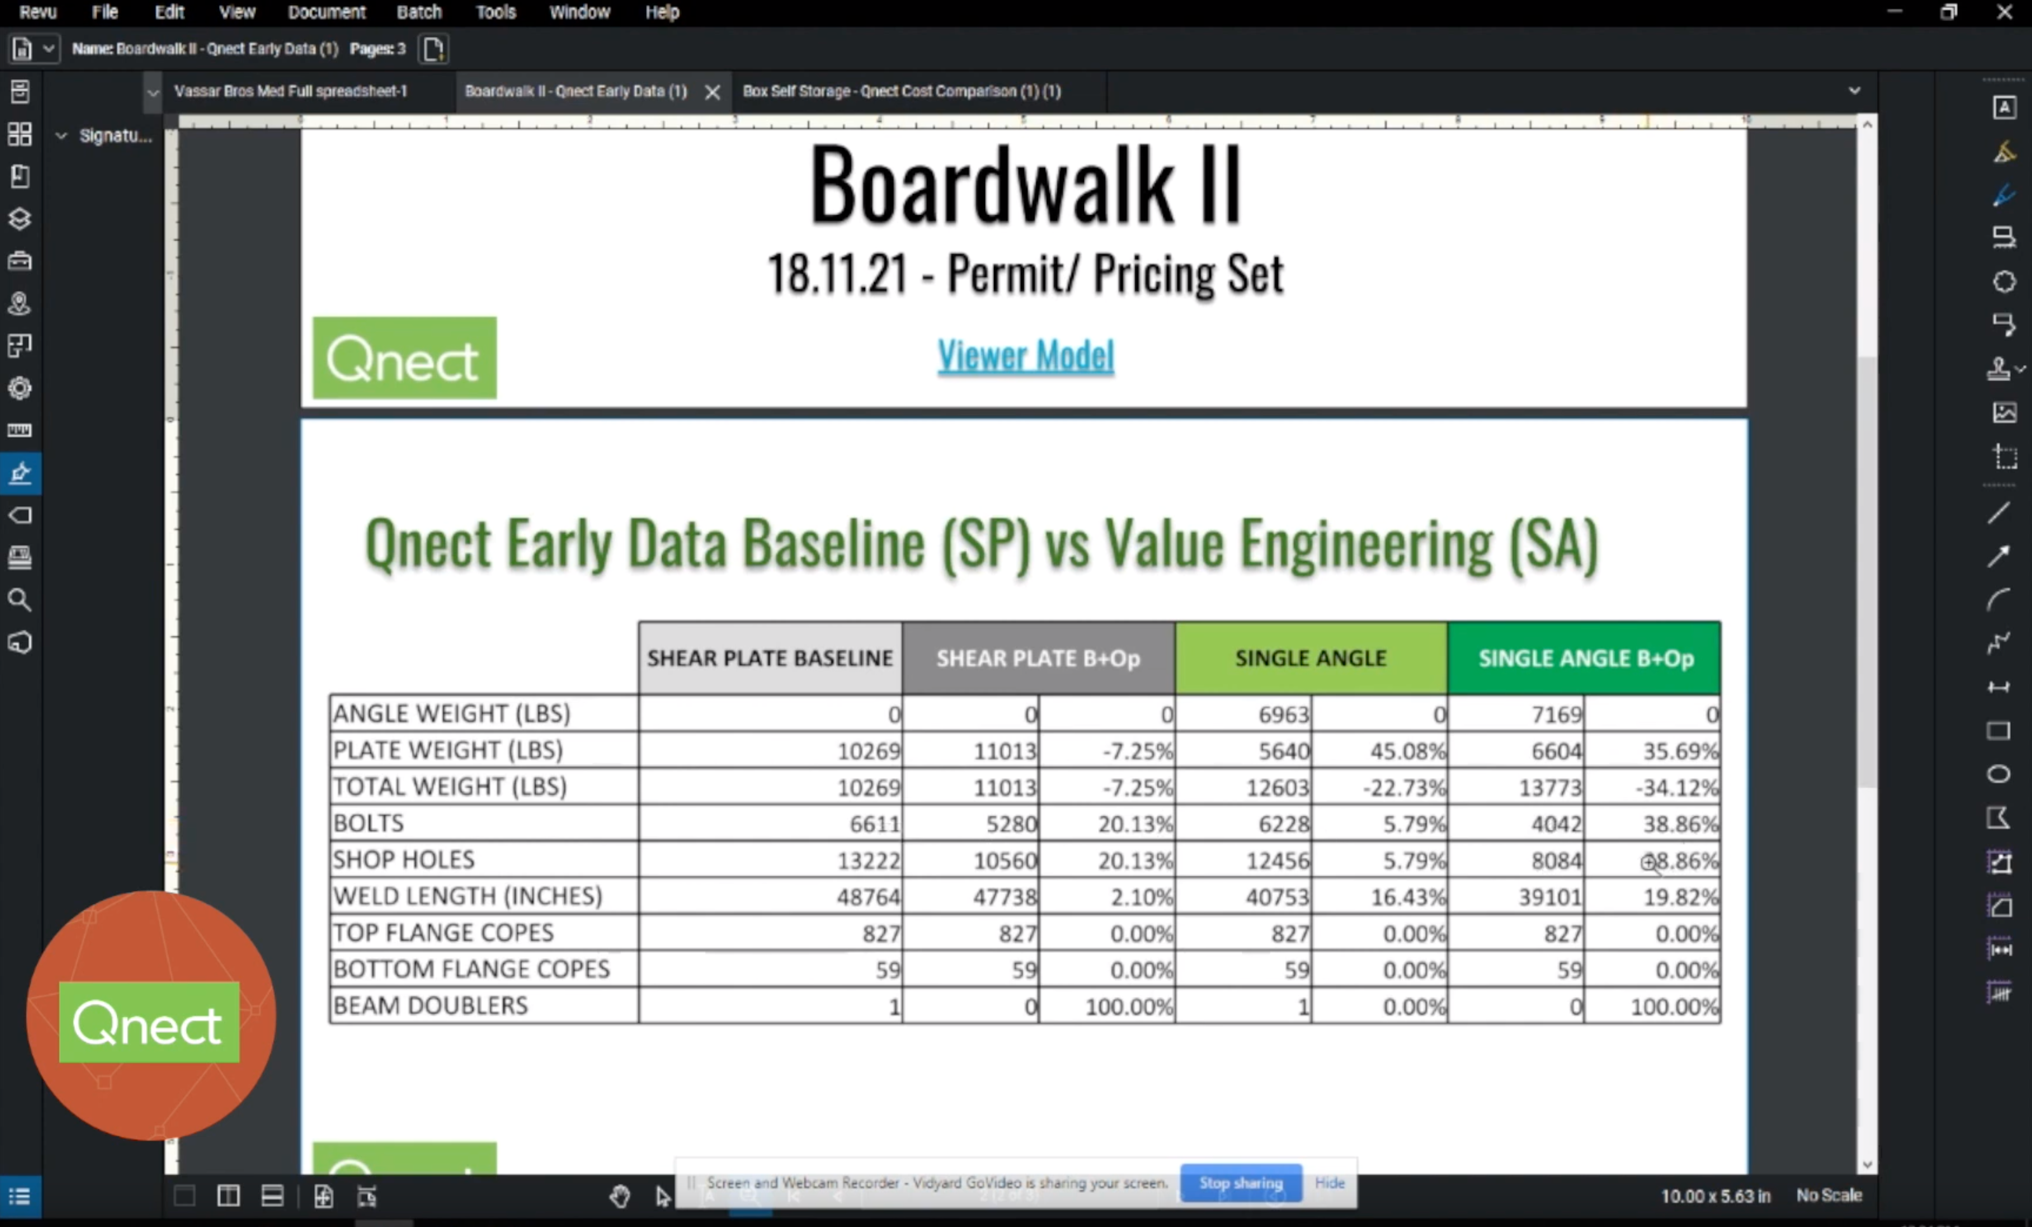
In this particular case, it was a double angle and then we have eight additional runs using share plates using share plates with A490 bolts double angle welded bolted we're not limited to this group this is a default setting and often this informs other ideas of trial joint configuration and so you can run as many as you feel necessary to get to the right joint configuration without any additional cost. So let's just examine this result as you can see from here to here where it says standard that represents the three inch spacing. If we just looked at this group for three inch vertical spacing we can see that our baseline created 18 bolts we can get down as low as six obviously shear plates. We can get down even with double angles to twelve so we can easily with other preferences created 33% and 1/3 percent difference by the cumulative effect of which material shop labor and field installation gives us our total here.
Now we are using cost unit cost from industry fabricators which can easily vary with your geography so you are able to put your costs on our website or we will work with your estimating department so that you can take files from us that can then integrate with your estimating.
We’re working with several fabricators that have committed to our service and we're integrating with their estimating process so that every job can be done this way estimated this way, files transferred and their competitive positions strengthened.
So we can see that 385 is the baseline in this case it looks like it's the highest and we can get down as low as 227, But if their client doesn't want some of the welding you know they have quite a variety of choices.
This is a sort of data that's available when you work with the Qnect software.
Now let's move to the side where we've got bolt optimization, which primarily means the vertical spacing has changed as we saw in the condition that we just previously connected. I mean that case about five inches so if the client didn't want to change anything about their preferences we can see that they can still go from 18 bolts to 12 bolts and 33% variation by changing the vertical spacing. For a cumulative savings of a hundred and four dollars so that's still pretty substantial.
If they wanted to consider other joint configurations then they can certainly get as low as 183 or even down to 260 and even at 260 we're saving 125 dollars almost a third and we're going from 8 bolts to 18 or 4 bolts from 18.
When you think about how fast this happened there is a significant impact on the schedule side and a pretty significant lowering of cost. One of the ways clients appreciate the time savings when you think about how design drawings often come out too soon because the project needs to move forward, schedules are very hard to keep because of all of the changes that come, RFI's that come, and so the time savings can really create extraordinary buffer to mitigating schedule drift and managing all the changes with the speed of the [Qnect] software.
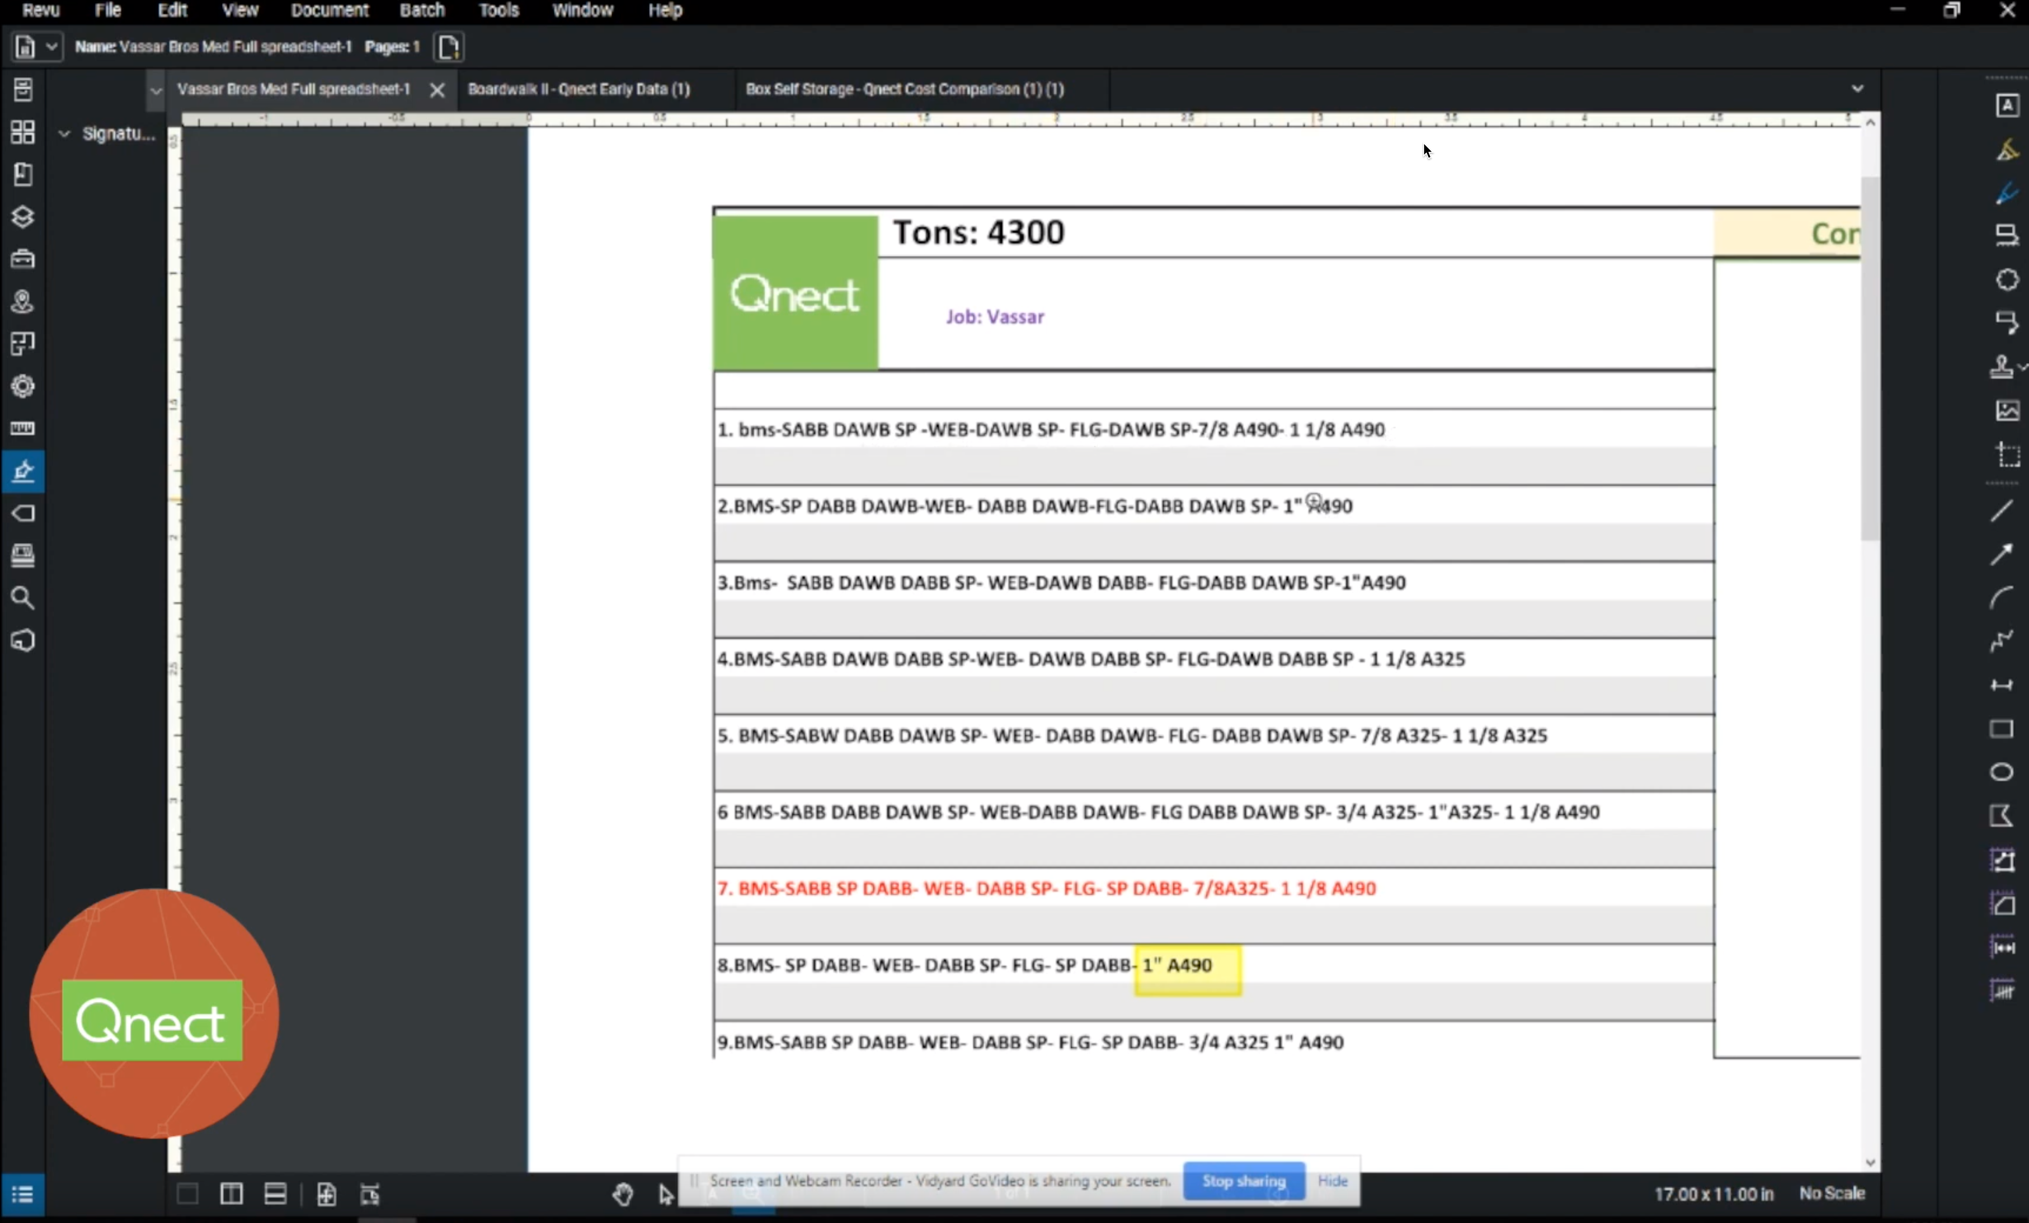
So now I want to take this from 1 joint and show you some results of a job that we did, one of the many across the country, where we ran the preference optimization as you will see here. This is what the client was going to use as their baseline we ran for nomenclature purposes being to beam single angle bolt; first priority double angle welding bolt; second priority a third beam to column web similarly beat the column flange 7/8 A490 inch 1/8 A490 and you could see a whole bunch of variations.
Then we compare the cost for the 3 inch vertical spacing only and we can see the client cost isn't bad but we can save another hundred and six thousand and when we examine the bolt optimization results if the client wanted to stay with their preferences they would still save 90 thousand but if they chose the lowest cost it would save a hundred and eighty and with our information this entire job used one-inch A490 not something anyone would have imagined; evaluated early because it takes extraordinary amount of computer power that only Qnect can provide to make this evaluation. But again, all of this is done either in the estimating stage, within the first day of the model being ready in production so a lot of time to really mine the data for the best decision going forward on this project.
A very amazing place to find oneself with the complexity of projects and challenges that we face.
Let me show you a couple other conditions that we were helping on the estimating side for a client. As we drill down further we take that information that we just showed you and then break it down - angle plate weight, total weight bolts, number of bolt number of holes to be drilled, weld length cope beam, web coping, doubler reinforcing.
Here is a job that we worked with the estimating on using their baseline of shear plates then we took the shear plate and optimized it and as you can see the the plate weight went up and total weight went up only 7%, which is really nothing. But the bolts went down 20%. We saved 1,400 bolts, the number of shop holes drilled, doubled amount of bolt savings - so he ended up drilling 20% less holes the weld length went down just a little bit and everything else was as you see.
Then we said let's try a single angle is part of another preference optimization and we can see that the total weight cumulatively went up in this case 22%. Again not really significant based on the cost of material but the bolts went down 6% and - in this case - the weld length dropped 16-17%. It's pretty significant from 48 to 40,000 so we're talking almost 8,000 linear inches of weld.
Then we also tried single angle again optimized. So this is a single angle standard bolts optimized compared to the baseline where total of material went up 34%. Again, not significant but it went up the bolt holes, on the other hand, dropped 38% so we saved about 2,600 bolts. That means 5,200 fewer bolts to be drilled also down 38% and the weld length went down almost 20%. [The] 9,000 linear inches the cumulative effect was a dramatic savings.
The final one will show you baseline double angle, bolt welded bolted, the baseline bolt optimized weight went down 7% holes and bolts went down 16% weld length went up just a tiny three percent. Then, if we look at the results for single angle B+Op we see a dramatic improvement first a total weight went down forty seven percent even though the angle weight went up the Shear Plate weight went down dramatically for a net reduction the bolts went down sixty three percent. We saved almost thirty eight hundred bolts 7,600 holes also sixty three percent the weld length also reduced fifty five percent.

This is a sort of data that's available when you work with the Qnect software. Our arc of services start with estimating where primarily there's no charge unless you win the job with us. This production provisions that are so fast and the ability to mine data early to determine the lowest cost joint configuration.
So with that I’d like to thank you for your time today.
21:13 ENDS TRANSCRIPT
Watch the video for the Q&A section if you're interested.
Access the Qnect app to enhance team collaboration and project efficiency. Sign in or create an account to manage communication and workflows with clarity and control.
1 min read
For this week's Tech Tuesday, we share how to change the connection type on the fly by combining Tekla Structures with the Qnect connection design...

1 min read
This special GC-focused webinar took place on November 20th, 2019. The webinar focuses on reducing time to construction for the general contractors....
![[Webinar Review] Analytics: radically changing how fabricators make decisions](https://www.qnect.com/hubfs/Aug%202020%20webinar%20Image%2007.png)
1 min read
In late August, we hosted a webinar focused on the power of analytics presented with Qnect data. The full video is below and then just below that is...