

 Pearl Burgoff
1 min read
Tech Tuesday: Following the Prescribed Checklist | Qnect
This Post builds on an earlier Tech Tuesday post regarding Model Preparation and will be followed by a post on Analyzing the Data, which gives us...
![Qnect & The Steel Tube Institute [Webinar Review] | Qnect](https://www.qnect.com/hubfs/Steel%20Tube%20Institute%20Qnect%20Connection%20Design.png)
This special webinar, specifically tailored for members and supporters of the Steel Tube Institute, demonstrates how HSS vertical bracing is made more efficient using Qnect’s powerful connection design and optimization tool.
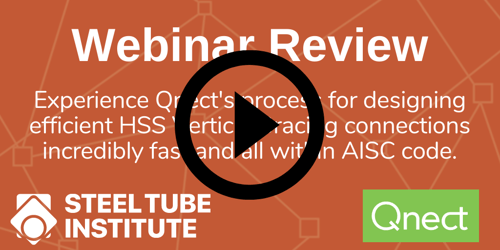
HSS vertical bracing completes Qnect’s full spectrum of optimized connections from gravity connections to moment connections and the lateral bracing system. What makes Qnect’s vertical bracing so efficient is the extensive use of their patented, iterative process for optimizing all of the engineering variables.
The video below presents an overview of Qnect and you will experience the Qnect process for designing efficient connections incredibly fast and all within AISC code.
Not in a good place to watch the video? Continue reading. We have a transcript of the webinar and screenshots supporting the content.
[Transcript after the introduction]
...and now into the connection engineering portion of things with Qnect. We'll go through some of the preferences and this is more just a real quick overview of preferences.
Let's get into that now. We have a web-based application and we call these preferences. All of the job preferences that we have we will set up. We have our pane on the left to show you where you're going to be going for these preferences.
We have our basic information; we'll come in and say okay we want to set our connection types up so our beam to beam, beam to spandrel...keep going down the line for column, column flange in bed so on and so forth.
We have the ability to say “you know I want to try to do ‘this’ maybe as a single angle that is bolted bolted and if that doesn't work we can start falling back on second third and fourth type of preference.”
I'll leave it as it is for this presentation with shear plate. We would go ahead and submit that and then we would go into forces. In this case the forces are in the Tekla the model so they will supersede but we also have the ability to fill out a table. We can go to specific profiles or we can just blanket those as maybe all w10s have a certain shear value and a minimum row so on and so forth. Same thing with the UDL factor.
We can give you a factor to use, so 0.5 being 50% and that's for composite beams as well as non-composite beams, short span members. Then here's another table again for minimum rows if they are required but like i said before we'll just come back here. If it says do not connect remaining that means 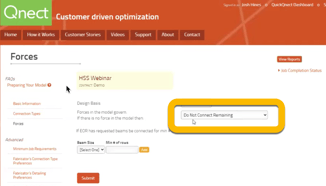 it's going to be in the model.
We have minimum job requirements. Some of our minimum maximums in there you know so on so forth like I said this is just kind of a quick overview.
Let's jump into the actual model. What i'm going to show you is this is a stick model currently. We're going to get some connections for beam to HSS column or post whatever you would like to call it. Same thing with HSS vertical bracing to some wide flange columns as well as some of the beam to column connections.
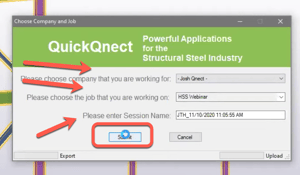
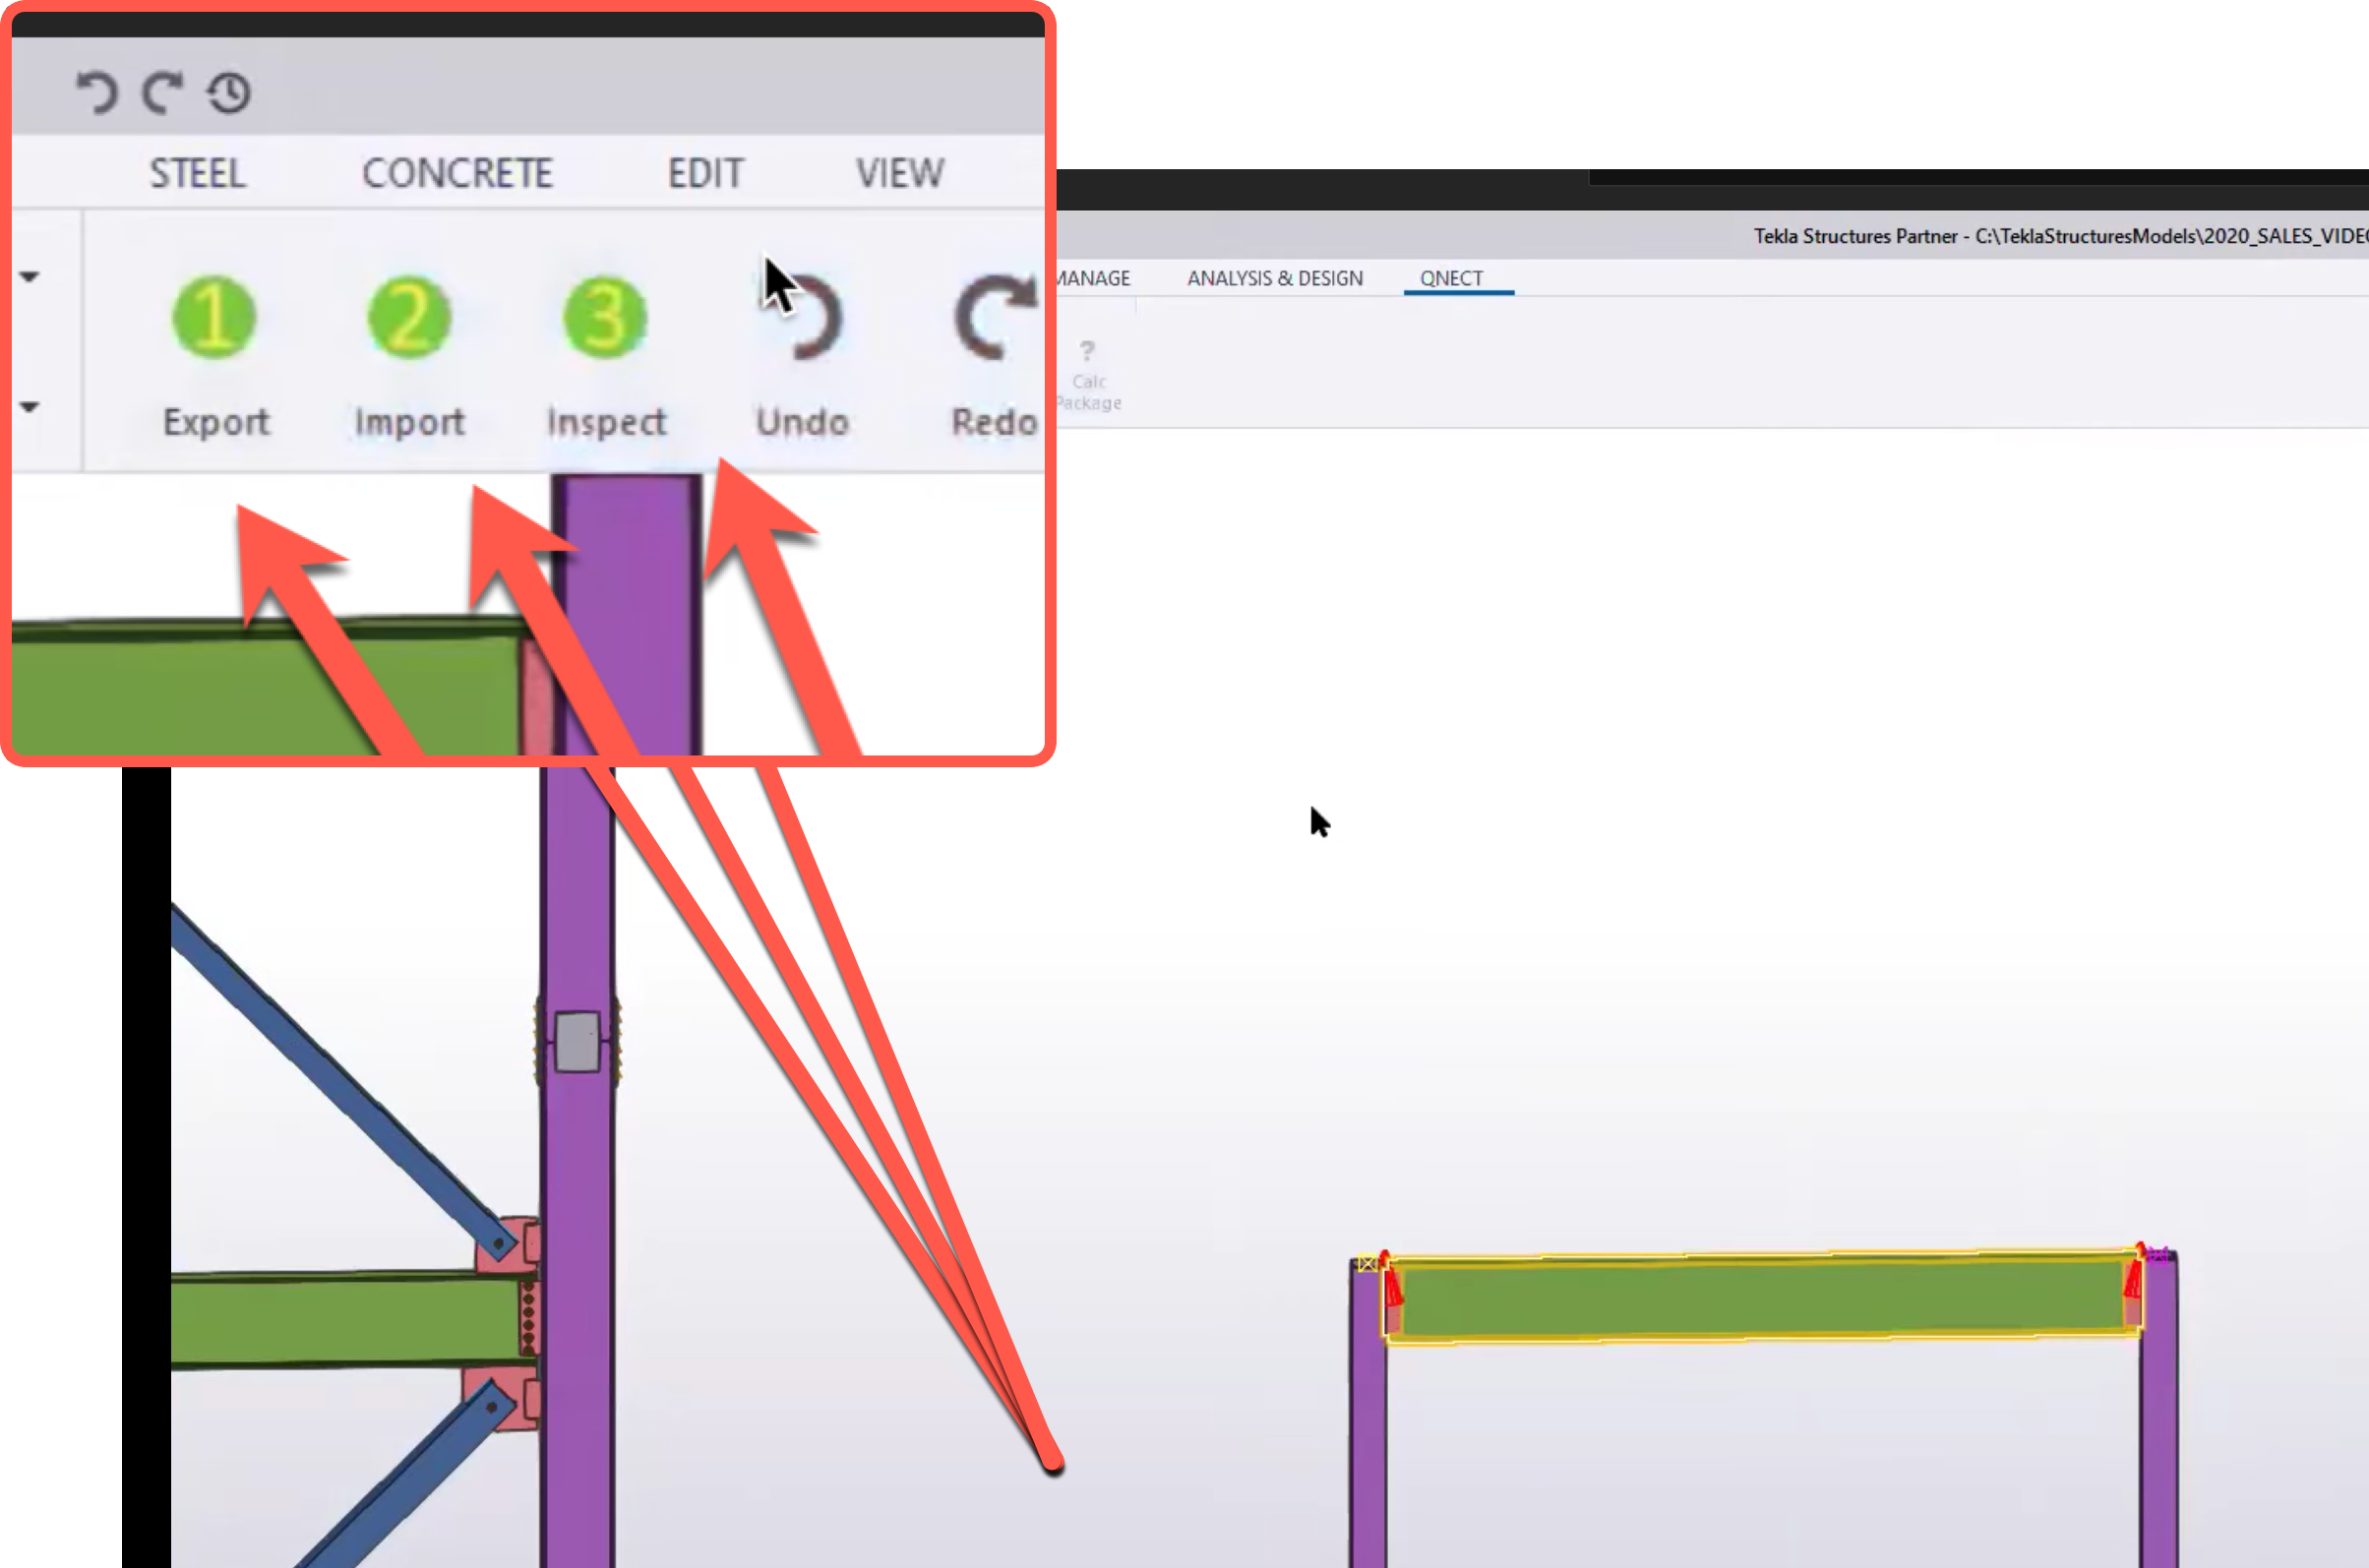
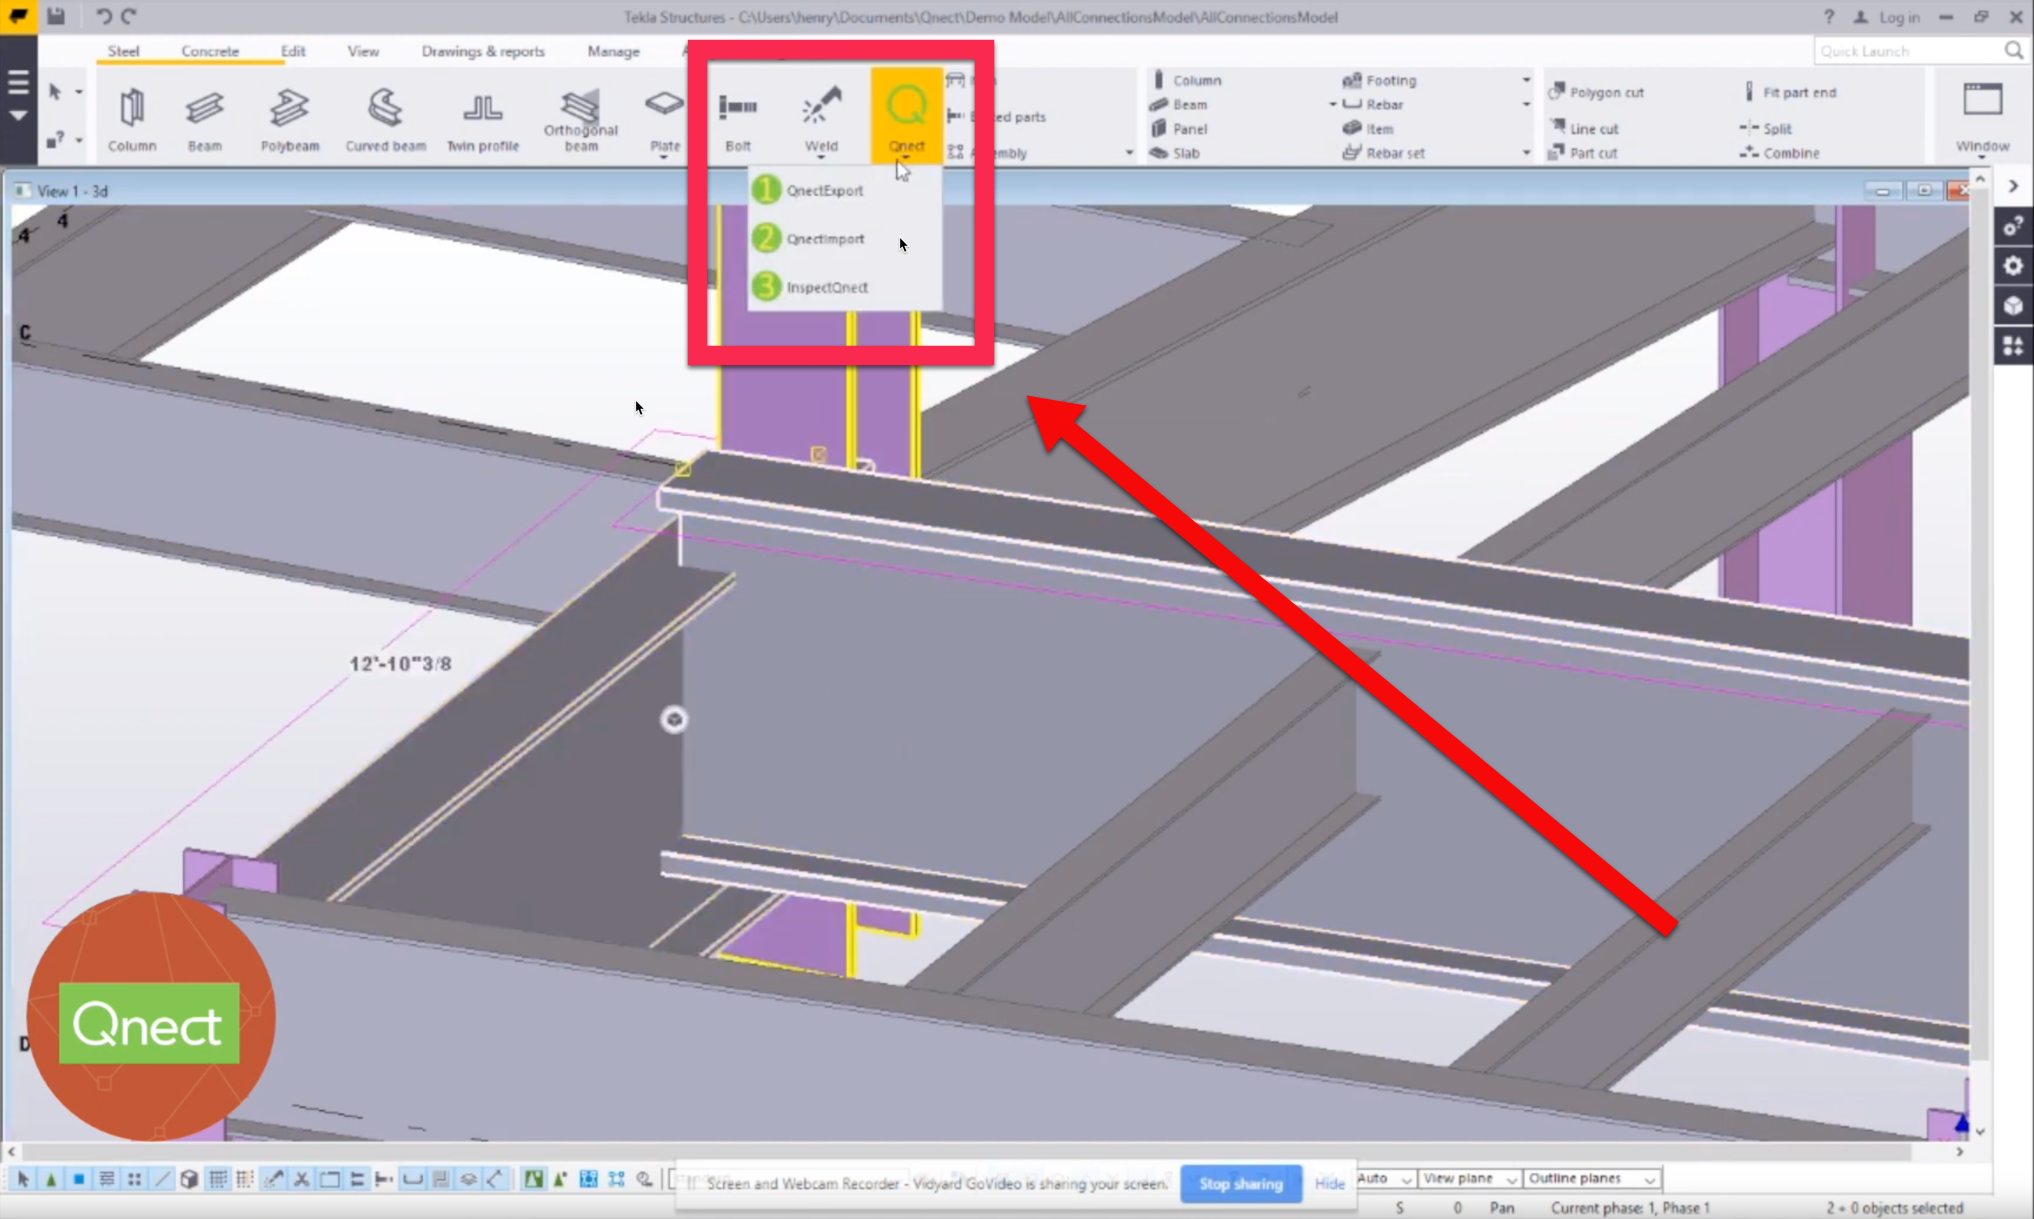
We'll first come in here. We have a one, two, three button process. [Button] One being export. We'll go ahead and select export. That's going to come up and tell us okay, what company you work with - you'll go ahead and select. Same thing with the preferences that we just looked at - what we're going to use. Then your session name, which can be filled out manually every time or you can set it up to to do something along these lines.
We'll go ahead and say submit. What this is doing, it's now extracting information out of this model. For instance, when we come in here we know that this is a 10x10 half inch vertical brace, we have some tension and compression some axial loading for this. Same thing with all the others. For this beam, at the start location, we know it's a 2468 we're looking for 20 kips here and a little bit of axial.
So all of this information gets pulled and extracted out of the model, goes up to our cloud-based system online, and we start crunching through and creating these components as connections within our system. As soon as they're done we will get an email just like this.
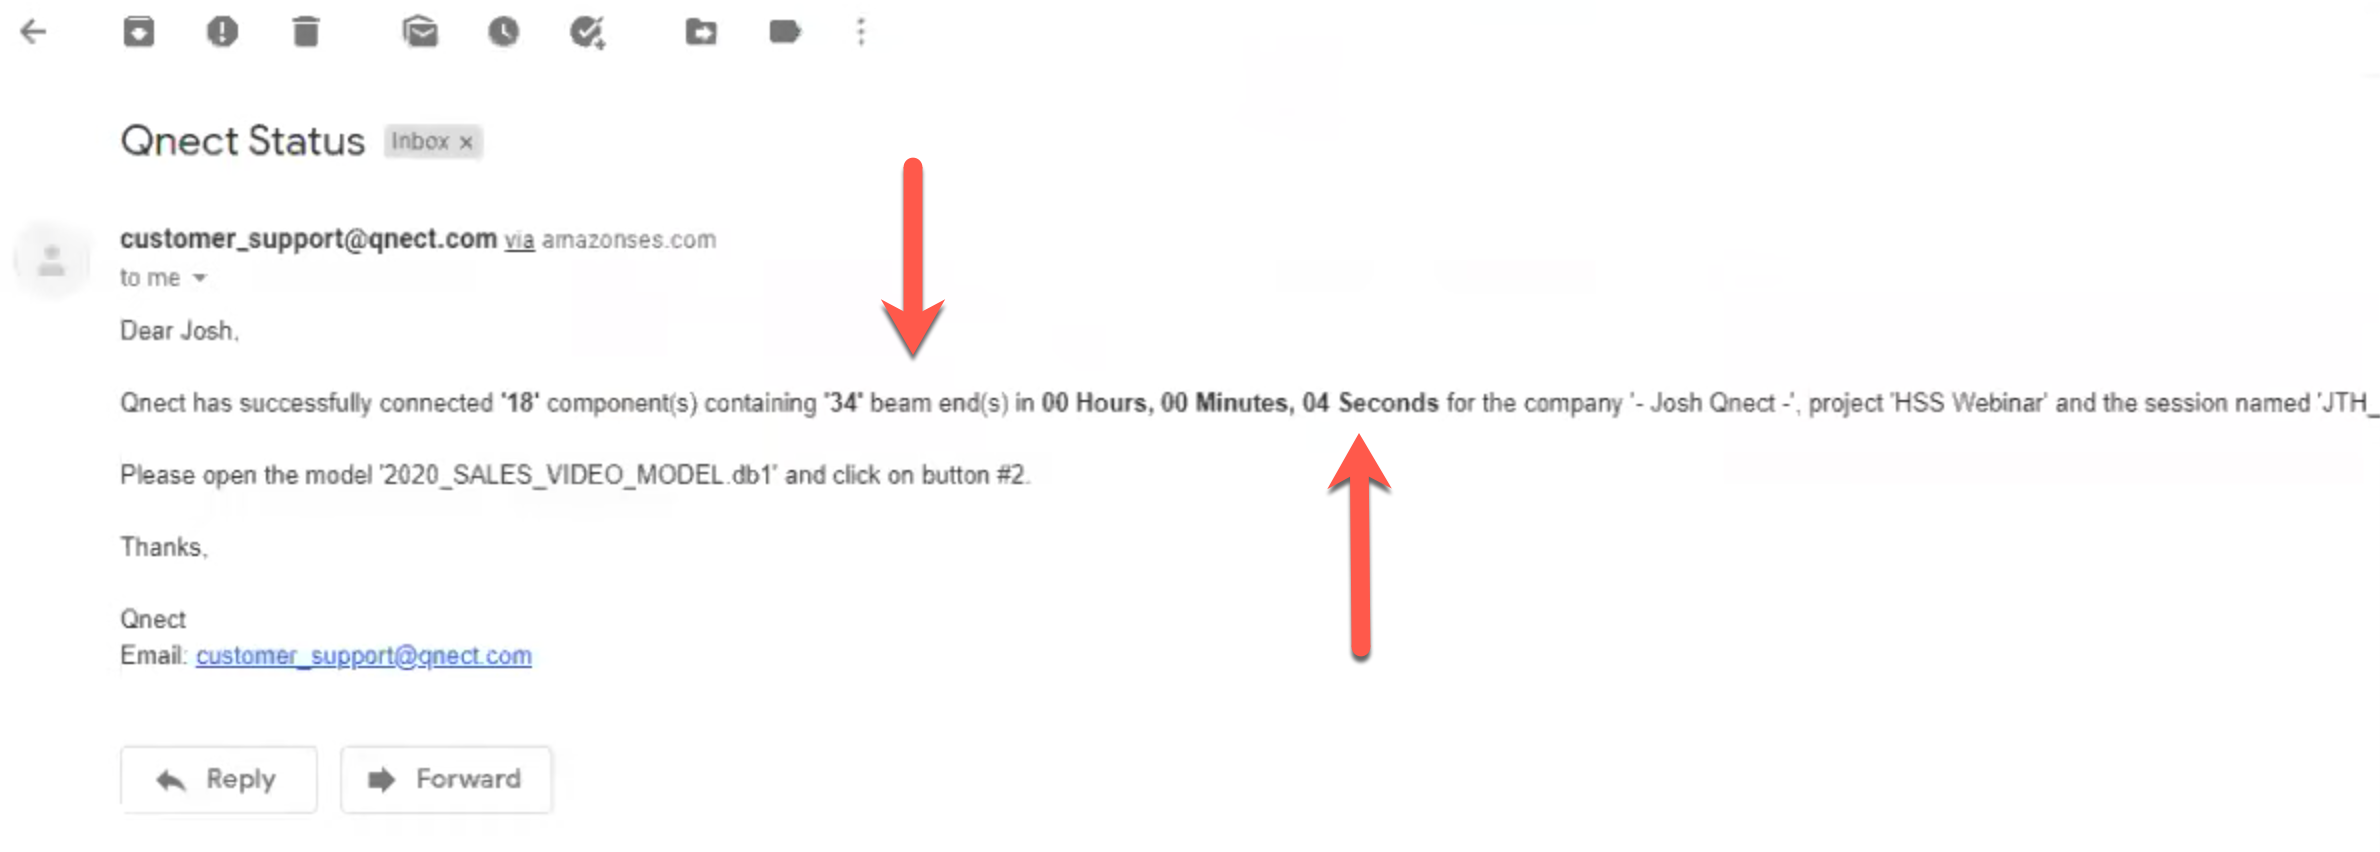
As you saw, we did 34 connections and we did that which looks like it was in four seconds. So this one was a quick one. Sometimes maybe a minute or so.
Let's go to button two - import. Not only are we importing content, we're physically bringing in components. These are going to come in as an actual Tekla component.
You're going to have not only the complexity that comes along with it but you're also going to have the ability to look at the calculations because they now live and breathe within these connections and everything that's in here is a hundred percent modeled - you’re going to see all the welds, all the bolts, the holes - for instance, you're going to see this is a through bolt as an A307 for erection purposes nothing more than that - you have your slotted holes, your shop welds versus field welds, so on and so forth.
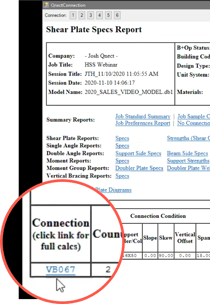
Getting into more of the meat of this connection, you'll see this is the entire component. Let's go ahead and double click on this component. You will now have a dialog that comes up. When you have multiple connections in one joint, which we have one, two, three, four, five, six you'll notice you can toggle through those. So as we open this, this is vertical brace callout067
That's what you would see on any connection code map or shop drawing reference. We have in this case the filler beam which is a 2468 going into the column so this is one of these two connections.
We can keep going through, toggling through the next one - same thing, it's one of those two.
[Non-Important Portion Skipped]
You have all of that information. If we come back in here and we go right here this is a link to our full calculation (refer to the above image) so this calc is going to give you the main calc and it breaks it down - the right beam to beam and you can start toggling through again. You have bolt strength, bolt bearing calculation - everything is laid out in the same manner every time - beam strength, you have your shear plate calc, so on and so forth and your weld.
Now when you come in here, you can go ahead and export this to a pdf. We're gonna compile this for you so we'll go ahead and say “yes” we want to open this.
Now you have this vb067, you have this as a 10 page calculation. It defaults to 8.5x11. And that's everything you're going to need for this one calculation.
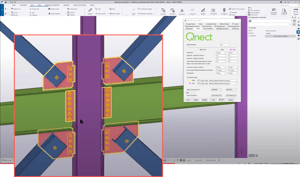
That is more of the overview of how to get a connection in the model. Let's go ahead and go over to the HSS columns over here. Because let’s try and make these more efficient, more friendlier for the shop, cost effective.
So what you see up here you have an 18x35 and you have five bolts on either end. Then you come here and you have a 2150, you have six bolts. Okay it's worth 102 kips and this one these connections are worth 83.94 kips.
So what if we want to reduce the length or even thickness of these shear plates, reduce the weld, the weld length, the volume?
What we have at Qnect is reducing the quantity of bolts simply by adjusting the vertical spacing. So as everybody is typically used to, you're going to see vertical spacing of three inches on center, you have your three inch vertical on center.
But let's go ahead and adjust that. I'm gonna come in and I'm gonna say button three which is our inspect Qnect; we have the ability to adjust some things.
I'm going to tell these to be under a different preference that is called “HSS webinar opt” for optimization. So now that I've selected these, I’m now telling those: I'm going to run with that job. You'll see these cones turn red, which means we're going to need to re-engineer these locations and we're going to simply do just that.
So we'll select these. We'll go back to our button one and we will re-engineer these just by saying submit. So that went up to our cloud-based system. Again you'll receive an email as soon as it's done. I'm not going to worry about that too much. What I do want to show you is we have multiple ways of finding this where we can just say okay is this still running, are we still looking, and no sessions are actually running. Now we know.
We can just go to button two and bring these back down. So you had five bolts on top six bolts on bottom here. Now we have three on top as well as three on the bottom. Let’s look at the vertical spacing of these: so we had three inch vertical spacing now we have four and a half here and we have five and a half here now.
This can be controlled within a quarter, half, or one inch increments. We can definitely define or control how we want to do that. In fact, we have certain fabricators that say I would much rather do three inch, four and a half inch, and six inch nothing more. We can definitely control that.
You've seen that we can reduce by doing this now this was worth 80 something kips now it's worth just under 50. Same here I want to say it was 102 uh right around 50.
We can take it a step further and we can say: you know let's optimize some joints and say we want these to be double angles. So they're going to be knifed connections. Let's go ahead and force these to be so. We'll go ahead again and I'm going to use some quick buttons so I don't have to go back to button one and select that
Now, you saw that we reduced the quantity of bolts but now let's go ahead and bring a double angle connection in. You may see this updating try after some time it's probably our internet connection with uh with the webinar itself.
Alright so now you can see on the fly we have gone from a sheer plate to a double angle. Of course it's knifed so you're gonna have your bottom cope okay but yeah it's worth 78 so it's gone up a little bit more but what if it doesn't need to be. Right?
Let's see if we can actually go ahead and achieve a single angle and start getting rid of some of the complexity here and make this joint a little bit easier more cost effective.
Alright bring this back down from our system. Now going from a shear plate to a shear plate with less bolts to a double angle knifed connection now to a single angle still with those less bolts. In fact, the weld volume or length is probably roughly around 40 to 45 percent less than the shear plate because of the nature of the double-sided weld at the shear plate.
So that's a lot of the HSS style connections and how to go about adjusting those and getting the best or the most bang for your buck.
We can also look at this joint here we have uh our gusset and we have you know certain amount of bolts. What if we can actually taper that gusset to be smaller? You'll get less weld and reducing that as well as maybe get rid of some bolts here.
We'll go ahead and remove this and let's actually go in here and say: you know I want to run this but I want to run it as the optimized project not the standard. So we'll go ahead and do that. Again, I don't know if it's going to come back that fast.
[Non-Important Portion Skipped]
Perfect it's done. Now we should be able to go back in and import everything back into this joint. There we are, so now we've been able to reduce some of that it looks like we have the same amount of bolts but uh not a problem at least we can reduce some of the shop and potentially field weld at this joint.
Alright so when it comes to optimization and being able to do multiple iterations, I want to show you a little bit of the preferences that we did use for the vertical bracing won't touch on it too much just enough to get the pointer across.
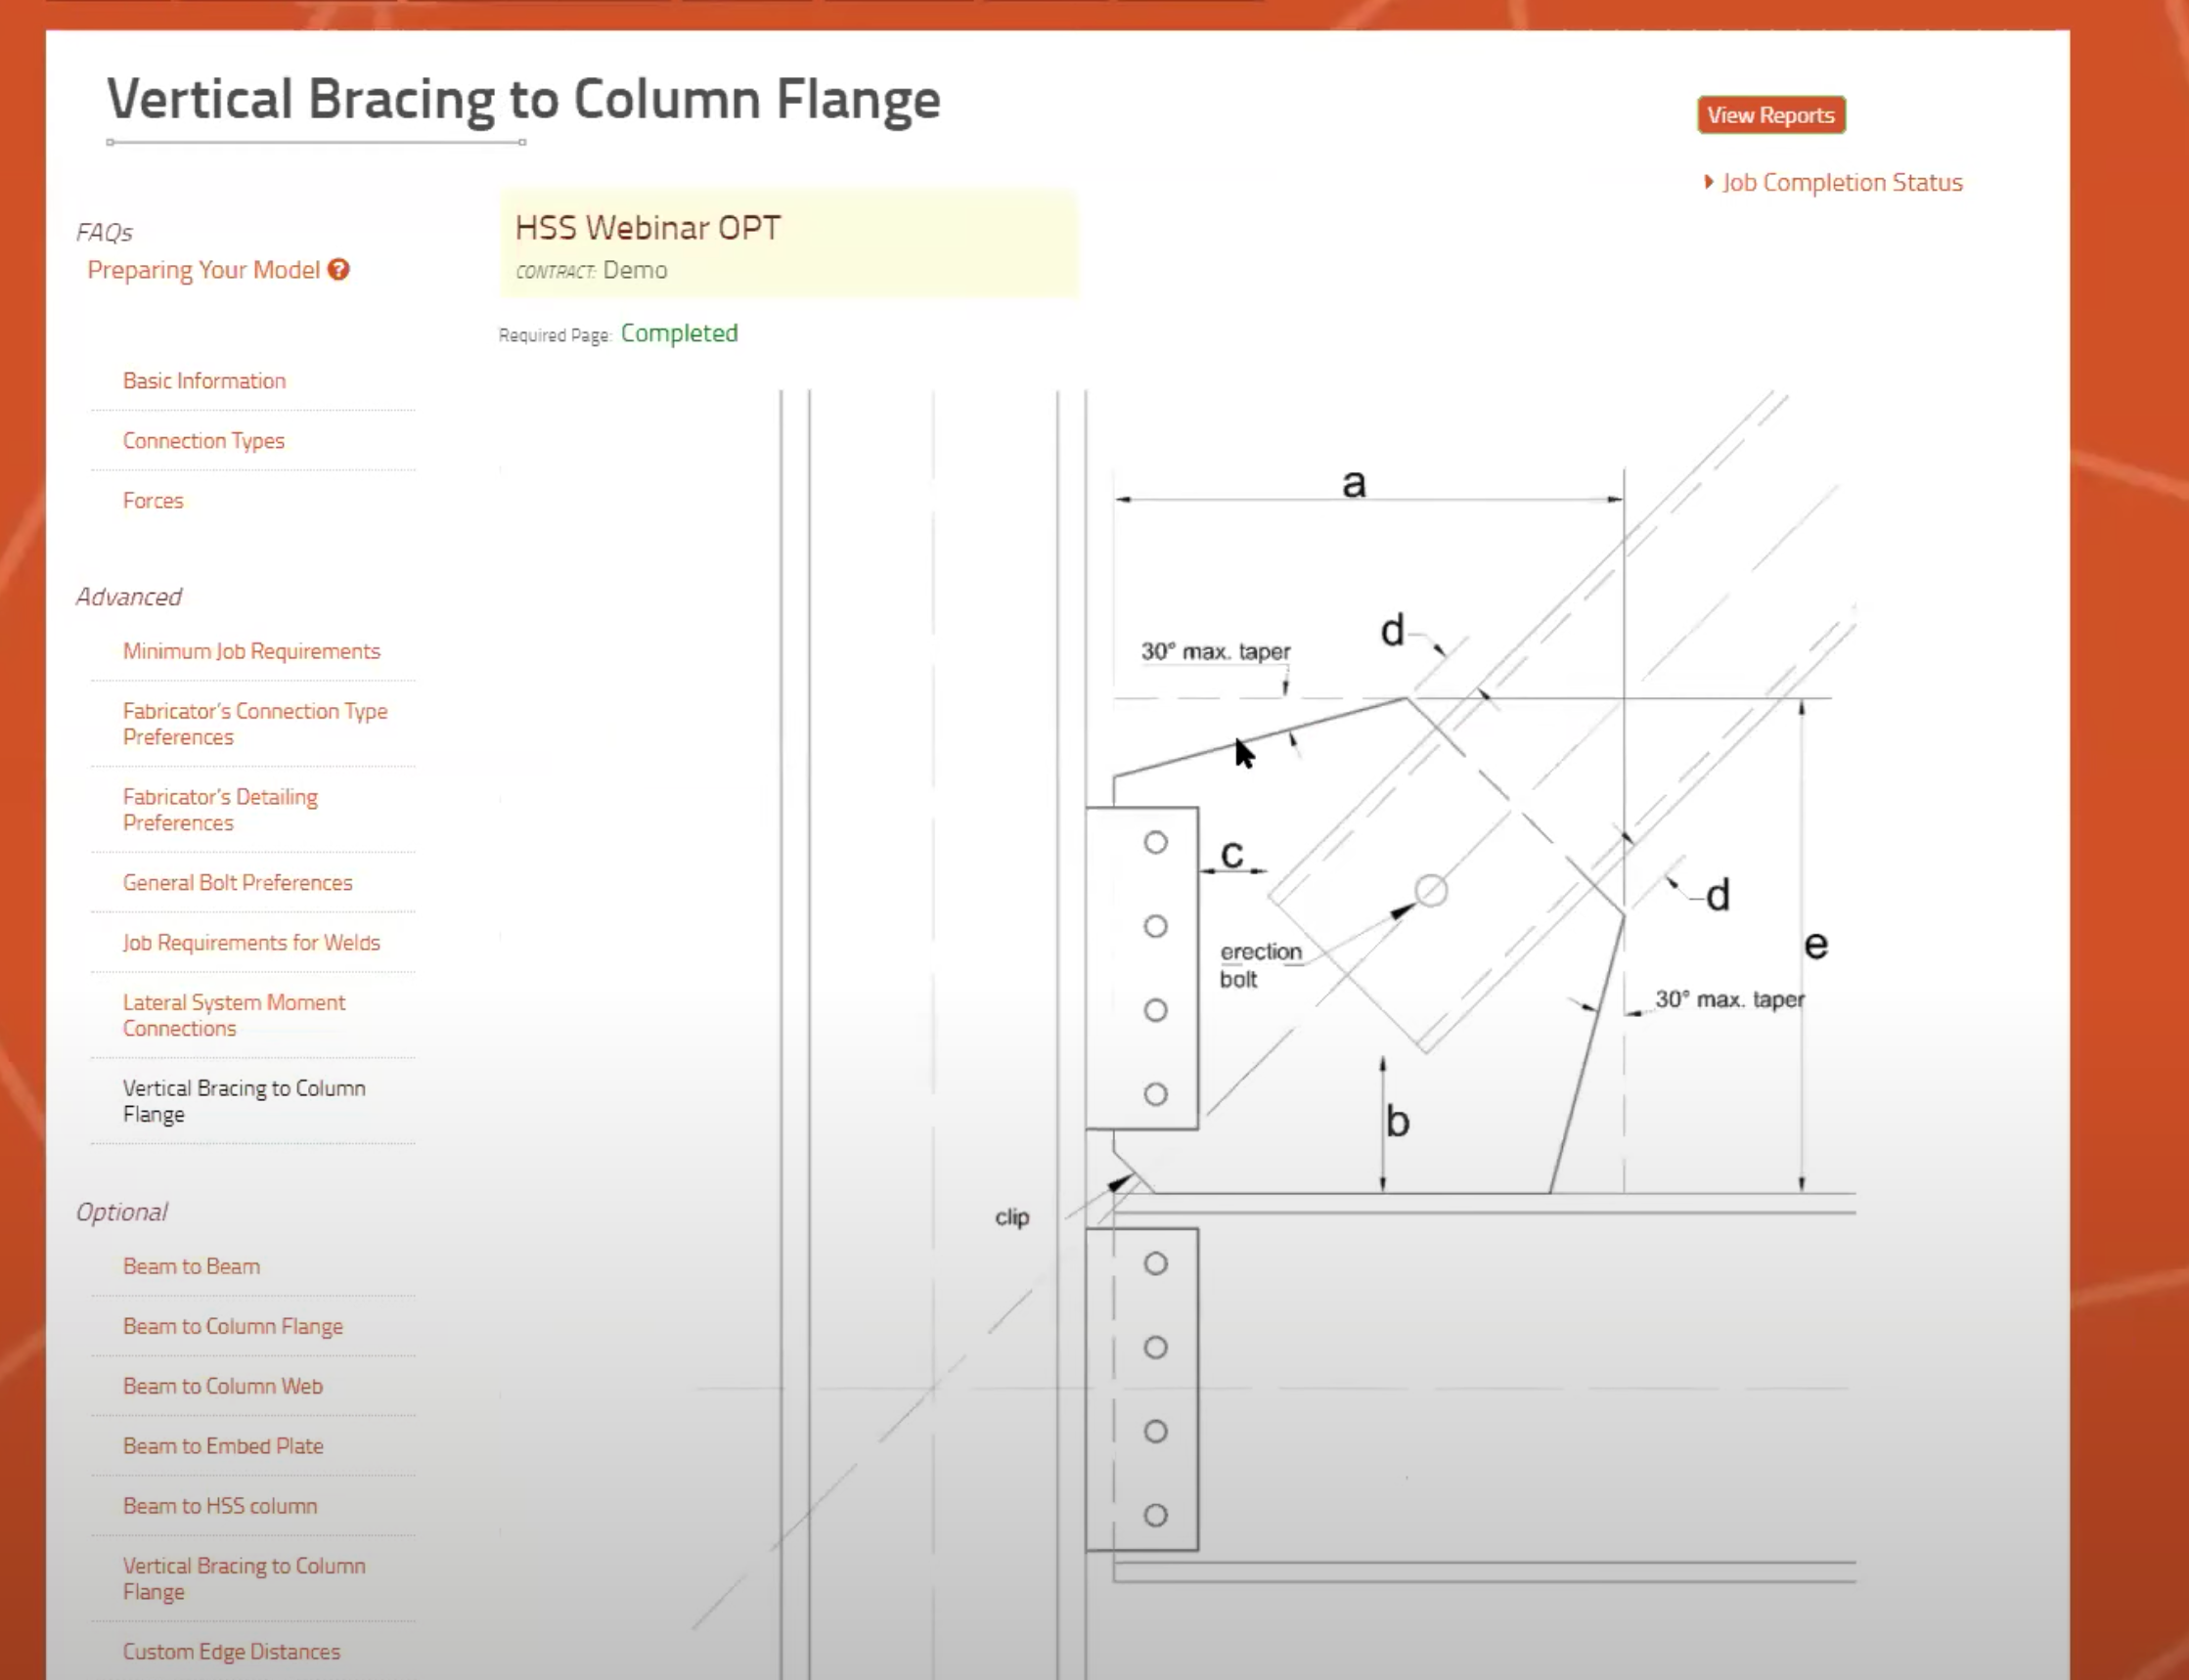
We have our little detail diagram which points you in the direction of our preferences. We have a minimum gussets, maximum material use, we're going to clip this corner or not, and your maximum gusset right so we can say “what's our maximum gusset distance vertical and horizontal” in our view and then what is our minimum clearance to a column or a beam splice so on and so forth with just minimums and maximums and do we want to make this more economical by cutting back the outer vertical so what I just showed you in that change. These all determine how we're going to approach our connections.
Alright so i think we're probably uh good to open up with some Q&A here and uh see what people are thinking.
You can go directly to the Q&A section in the video here on YouTube.
[End of Transcript]
Access the Qnect app to enhance team collaboration and project efficiency. Sign in or create an account to manage communication and workflows with clarity and control.

1 min read
This Post builds on an earlier Tech Tuesday post regarding Model Preparation and will be followed by a post on Analyzing the Data, which gives us...

1 min read
In celebration of the U.S. structural steel industry, you’re invited to a special webinar with Qnect as we host a SteelDay event on Friday, September...
1 min read
Qnect's Henry Lederman and Aaron Bartlett, recently hosted a webinar titled "Determining the Lowest Cost Joint Configuration" for the general public....