

 Pearl Burgoff
1 min read
Webinar Review: GCs Learn How to Reduce time to Construction | Qnect
This special GC-focused webinar took place on November 20th, 2019. The webinar focuses on reducing time to construction for the general contractors....
Wow! This has been one of our most popular videos and we think you’ll get a lot out of this too. In the transcription, we have images pulled from the video so a combination of video and text with images should deliver what you need to analyze the data in Qnect. We’re excited to share this with you and even more excited to analyze the data from one of your current or recent projects. The best way to understand what Qnect can do for your business is to put it to the test. You’ll see on this page, a short video but then you’ll see directions of how to get that project to us.
Transcription
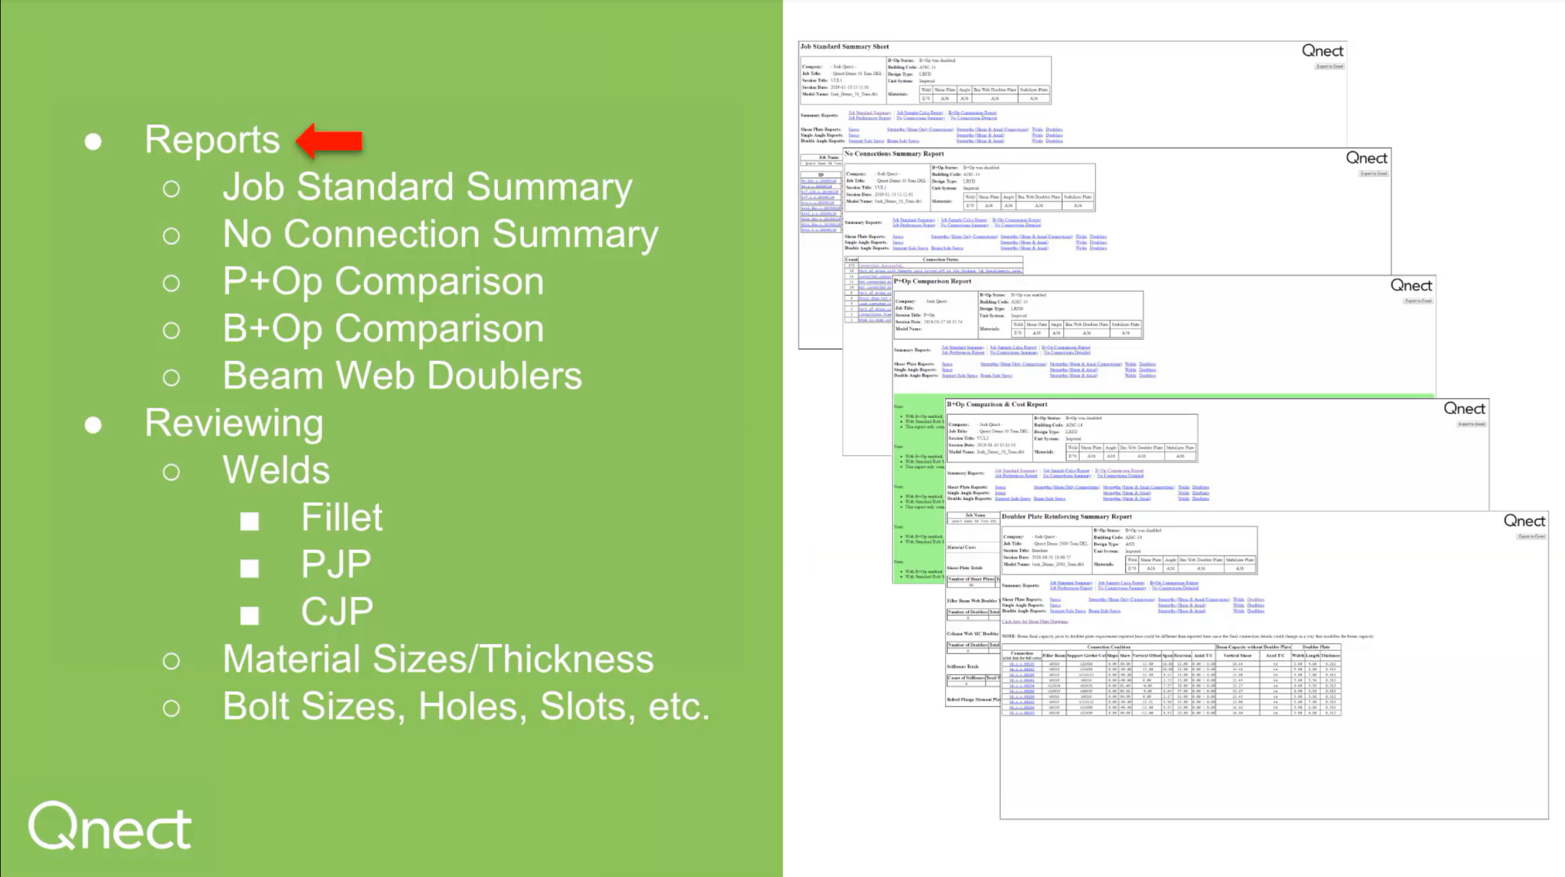
We’re going to look at reports. So we have a few reports here:
Job Standard Summary report
No Connection Summary report
P+Op or Preference Optimization comparison
B+Op or Bolt Optimization comparison
Beam Web Double reinforcement report

First, we'll be jobs standard summary. Okay this is the job standards summary sheet or report and it gives you an overall of your project for your initial run. As you'll see here you have beam to beam connections that are single angle bolted bolted and also beam to beam connections that are shear plate. There are 55 of the single angle connections and there are 36 of the shear plate connections. You'll be able to notice beam to column flange, beam to column web beam to embed and beam to HSS connections.
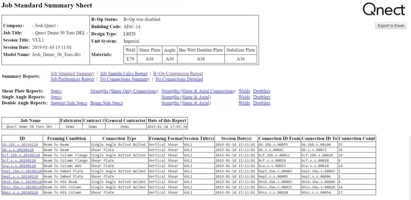
Now if you were to go into one of these ID location areas you will notice group IDs and then calc IDs. These are links that will take you to the long calc information. There's a group that will take you to the actual group. So for instance, you only notice one actual connection in here and that's because there is only one W40x149 framing into a W40x167. If they were multiple, they would all be in here. You will also be able to look through this document to find out if that member is sloped or on a pitch. If it is skewed outside of a 90 degree angle, you'll be able to find the actual span, the reaction requirement, the capacity and also bolt information, connection material information, top and bottom cope information if required, beam edge distances and then reinforcement plates so on and so forth.
So reviewing this information, making sure it is accurate will really let you hone in on adjusting anything that may need to be adjusted to revise any of your Qnect runs.
Let's now move on to the No Connection Summary.
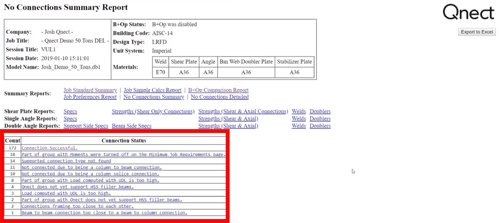 Now we'll look at the no connection summary. As you can see there are a hundred and seventy two (172) connections that were successful. Let's dig in and find out why some of the connections that did not appear could not be connected. So for instance, if you look, let's go to 18 of these were part of a group with moment connections that were turned off on the minimum job requirements page. So we may have had moments in there and when doing an initial run we wanted to turn them off so that's exactly what we did. So now we may want to go turn those back on and rerun. Then supported connection type not found so that's a type that would not be in our library. Same with the next two a column to beam connection there's a specific reason why it's a connection that we don't supply and then a column splice currently in our library we do not do column splices. And then there are eight members that are part of a group with load computed with UDL is “too high.” So what that's telling us is we have used a universal design load factor that has been provided to us or that we have used to qualify and because of that the actual reaction is too high for us to meet with the capacity. So at that point in time we may want to write an RFI to be able to find out if we can get the actual reactions on a project.
You will also notice there are three more same type of a deal. Then at the very bottom - this happens from time to time - and this is why definitely why we veet the connections. After an initial run you will notice there is one beam to beam connection that is too close to a beam to column connection. Because it is in tight quarters we would actually go back after the initial run and select both of those beams - the supporting beam and the beam that needs to be supported. We would rerun and in most cases we would be able to actually achieve that connection.
Now Preference Optimization
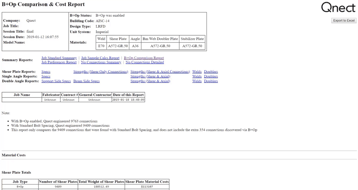
Preference Optimization comparison report - we have the ability to run nine iterations of the same project in multiple connection type preferences. What that may include is your baseline per design may be a shear plate design for beam to beam and a double angle for beam to column flange. But we have the ability to run that in multiple different ways to where we could have beam to beam be a single angle bolted bolted, beam to beam be a double angle welded bolted you know. We can switch things up run nine different schemes with different bolt variations and spacing we don't have to include bolt optimization in that but we can.
And this is the results that you would get. We would show in our first run if we did use bolt optimization along with preference optimization we were able to connect thirty-nine connections and we were only able to do 38 connections with this standard. The next run was 40 connections compared to a 36 so we would do that we'd be able to go through all of these different nine different runs and we would then come over here and look at the baseline. We can click on that it'll take us to the baseline report that job summary report or we could go to any of these other ones and select those as well and it would do the same thing it take us to those specific connection variations to be able to put time and cost to.
Okay our next report will be Bolt Optimization Comparison.
Before we get there I just want to let all of you know you probably saw some weird spots in the previous report maybe some blank spots and that's because we always make sure to never release client privileged information so it looked kind of funny but I ended up hiding that information.
Bolt Optimization comparison report - bolt optimization comparison and cost report as always we have taken out all company names for privileged purposes and what you'll notice in here well
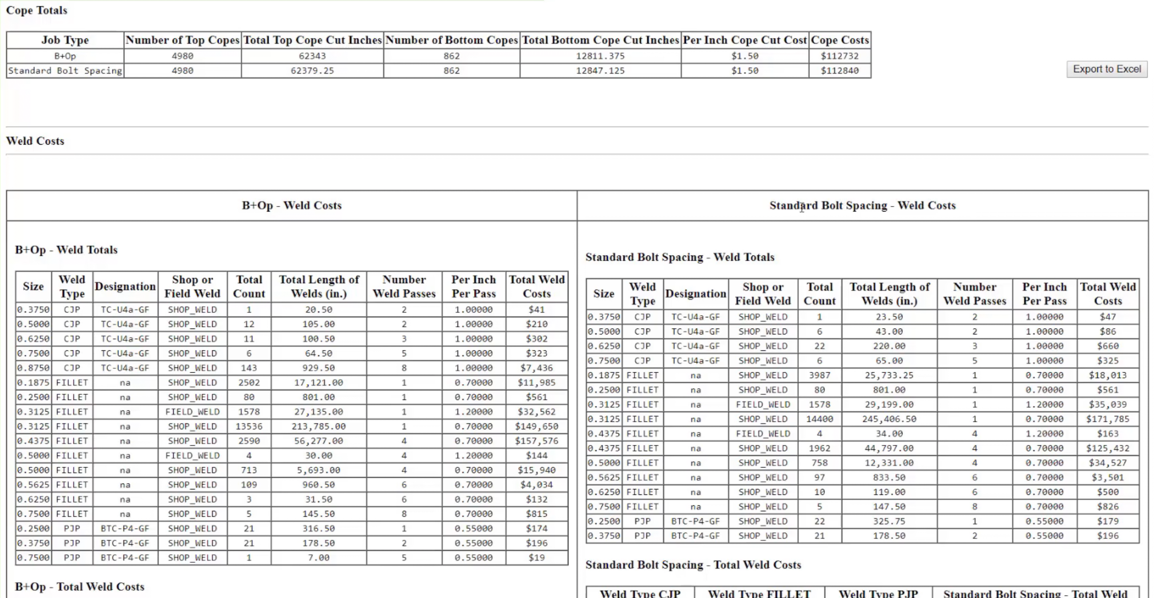
 I guess first off what is B+Op bolt optimization? Here at Qnect we have the ability to run the three inch vertical spacing in connections, from anywhere from three inch all the way up to six inches in half inch or one inch increments; whichever, you would like, to be able to reduce typically 20 to 50 percent of the bolts on a project. Once we do that and you get into this report you're gonna see the results of that but also a lot more. Here you can see material and you'll see cost as you have in other reports keep in mind these are the cost of what we've accumulated over time; these will not be your exact job cost. Those will need to come from you internally or you can add your actual unit prices into our system which will then populate in these locations. For instance you will see shear plate totals, web double totals, column web so on and so forth.
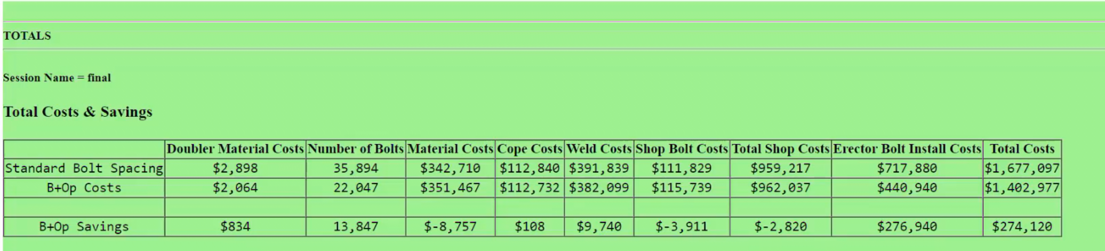
Let's get into some of the connection materials and then you'll actually get into some of the copes, the welds which we show the size of the weld, the type of the weld, the designation how many there are, the length all of that type of information and we compare that from the optimized compared to the standard or baseline per design run. We will bring all this information in look at the bolt counts and then at the very bottom, highlighted in green, you will notice the actual quantities. The standard bolt spacing in this case there were thirty five thousand eight hundred and ninety four bolts (35,849) and with using bolt optimization - just simply reducing the quantity - we were able to take that from thirty five thousand all the way down to twenty two thousand (22,000).
We were able to save thirteen thousand eight hundred and forty seven (13,874) bolts. You really go into that type of information and think what could that do if you're a detailer, for your fabricator, for the erector or if you're a fabricator what could it do for me and my bottom line.
Our final report to review will be Beam Web Doublers
Web Double a reinforcing summary - so what we're looking for in here is you'll notice to the right-hand side your doubler plate itself we're looking for the actual thickness and material, the width of that plate and the length of that plate. For instance with this specific member you know we're looking at W12x19 that's framing into a W30x90. It requires a 56 Kip reaction and we're able to meet that with the capacity of just over 41 Kips. With the web double to get to a third party connection 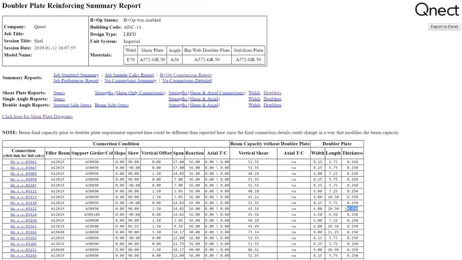 engineer or really your EOR to find out if loads can be provided specific in locations. If you are using a UDL factor or if loads have already been provided if in this case 41 Kip's instead of 56 would actually be feasible at this location. This gives you the ability very early on to start looking at these locations and getting with the design team to see if you can actually reduce some of this information; in turn, reducing web SS or any type of required reinforcements.
Okay so that's the reports and the information you're looking for there
Then, really just to capture everything that we were trying to review in some of those reports you know welds whether you're looking at it in a report or you're looking at it in a model for review. Also material sizes thickness that type of thing so when you're setting up your preferences you may set up your specific size that you are looking to use at a connection but we also have iteration control. For instance if you have a four by three by three eights beam sorry four by three by three eights connection angle that you're going to use but you have the ability to also put all the different types of sizes, as a fabricator or as a detailer for your fabricator, you can put all the different types of sizes used by that fabricator and we will not supply a connection if it is not provided in that iteration control.
Finally, bolt sizes, holes, slots etc - anything that you notice whether it's in a model or online you know you're gonna make sure that the bolt sizes are what you expect; the holes whether they're standard or slots are in the correct material that you're expecting as well.
Our final topic which will be finalizing the process - we will be talking about deliverables within this process.
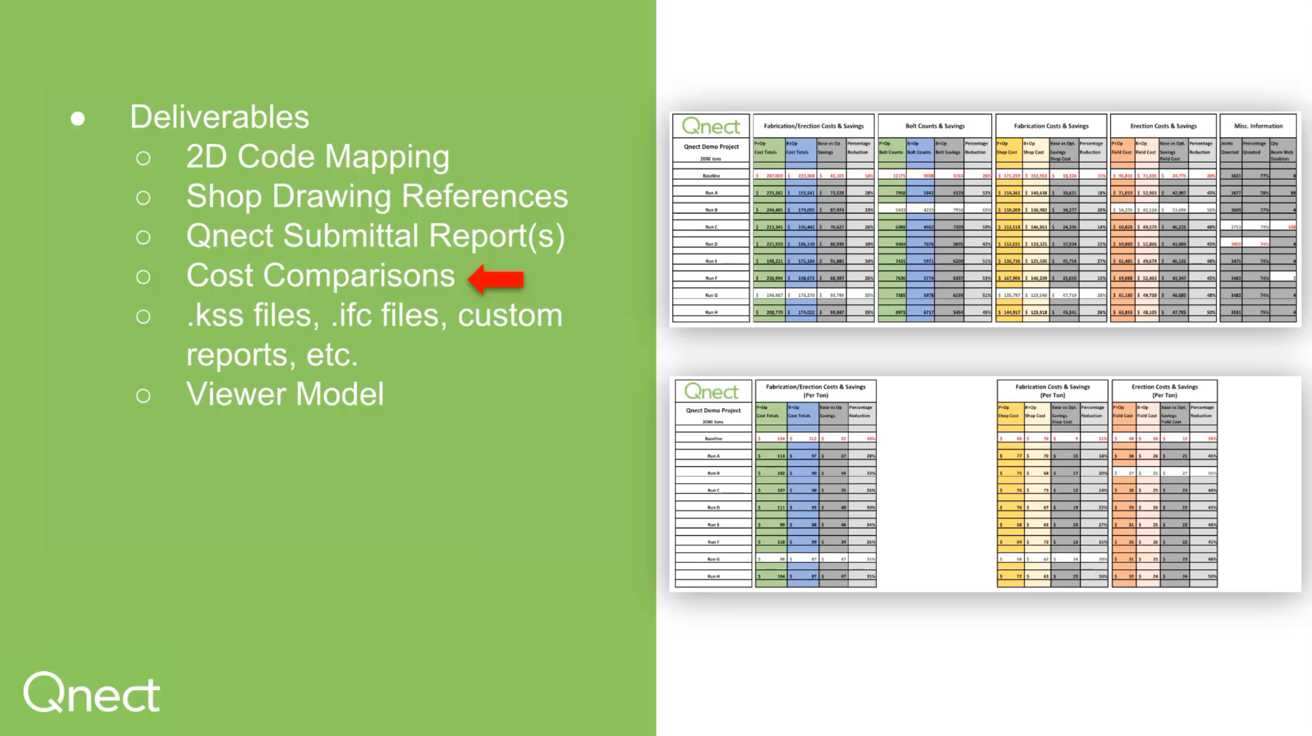
First, let's look at 2D Code Maps. Generating the information from our connection codes with connection information for a faster review to put in a 2D code map per floor plan or per framing plan locations. To accompany that we also have the ability with shop drawing references for those areas so if you have connection code maps that are going to have a connection code specific to your start and end handles you can also represent the same information on a shop drawing - makes for a lot faster review with a third-party connection engineer or with the EoR. Then submittal packages whether this is an internal submittal for review for a CE you know connection engineer or for an engineer to review when you send in your standard approvals. Same as cost comparison reports. As well as KISS files IFC files maybe some custom reports could be FabTrol type files FabSuite, StruMIS so on and so forth. Finally a viewer model we have the ability to export our model into a viewer system what you see on screen at this time is Trimble Connect and this makes for a very useful tool if you are trying to supply a model for your clients so they can physically see what you already have in a model whether it is at proposal time or later in the game.

1 min read
This special GC-focused webinar took place on November 20th, 2019. The webinar focuses on reducing time to construction for the general contractors....
1 min read
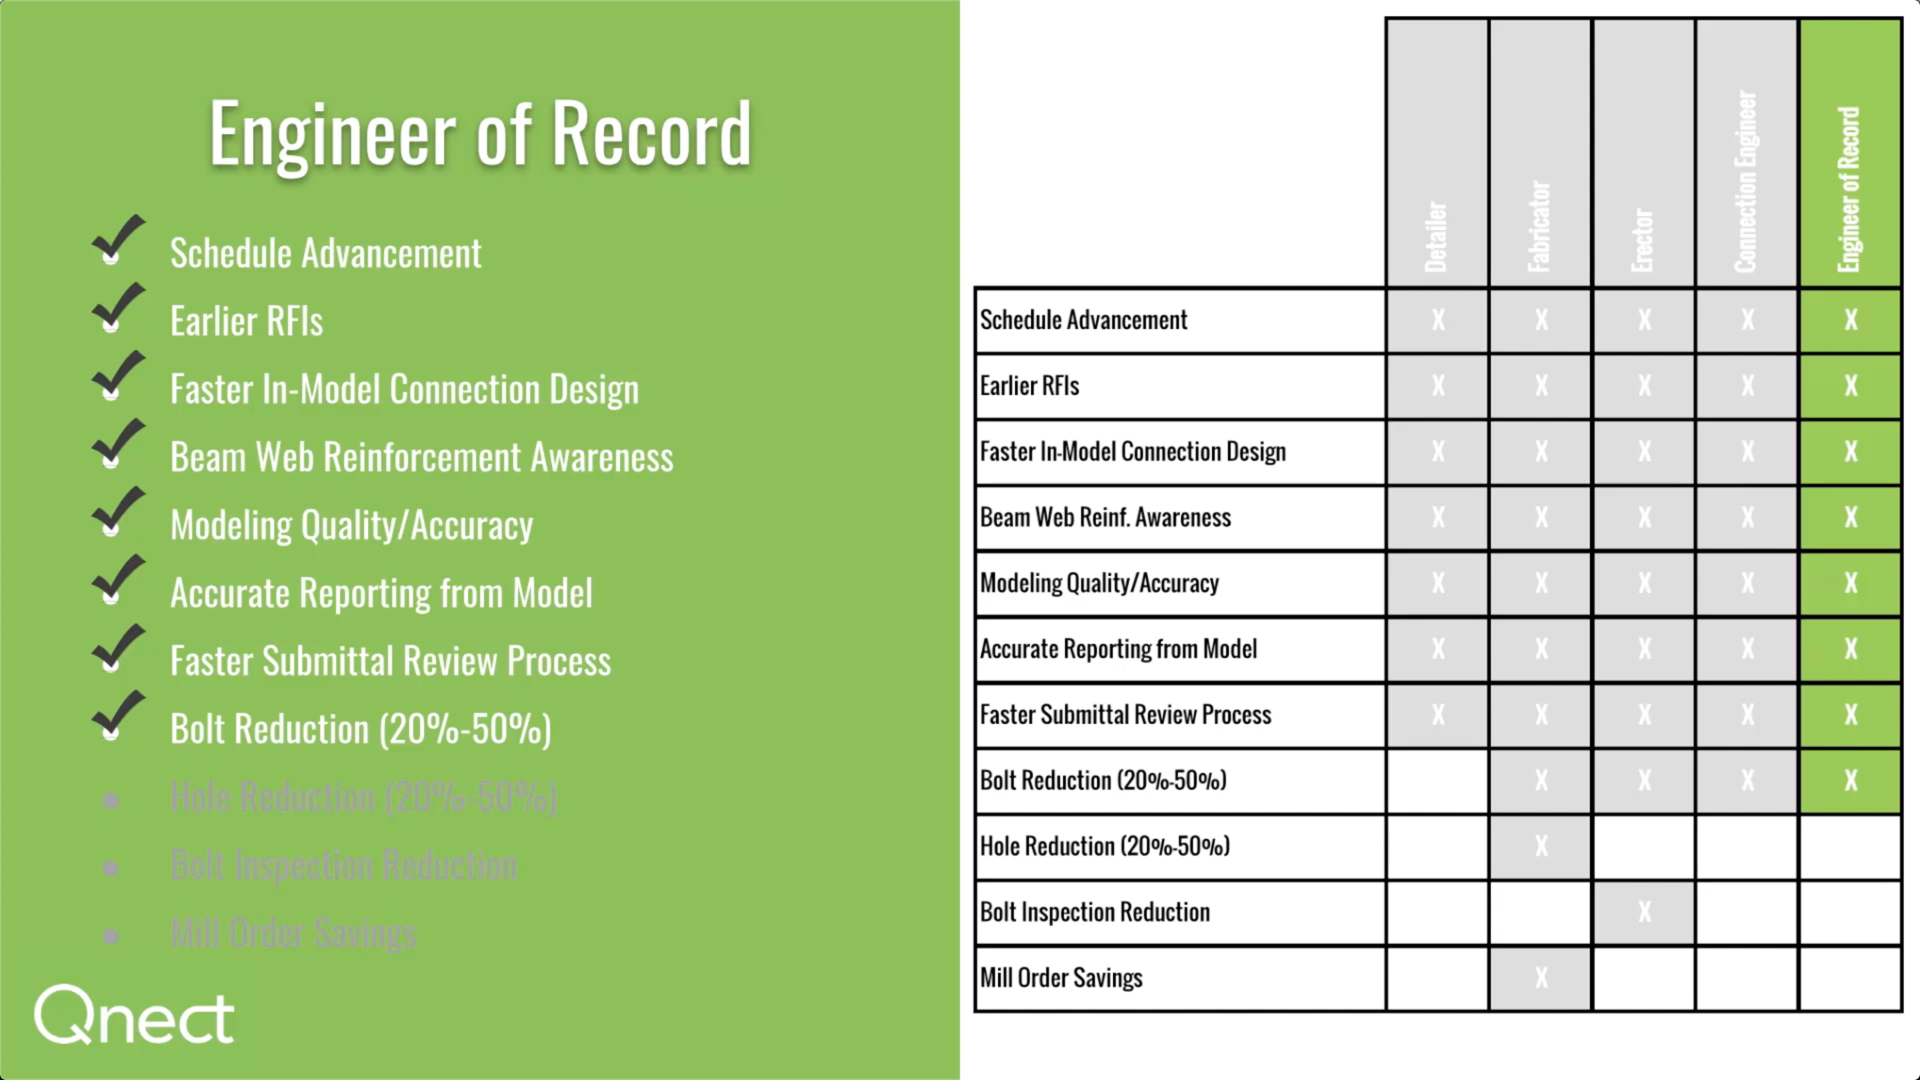
Are you a structural engineer - a Connection Engineer (CE) or an Engineer of Record (EOR)?Qnect's SaaS solution provides a solid Return on Investment...
1 min read
To be more specific this is a Preference Setting update that focuses on the Global Shear Plate and Single Angle Placement.